


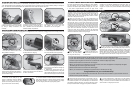

1. Open the battery compartment door
located at the upper rear of the Shooter
by using a Philips screwdriver (not
included).
The Duck has a built-in, non-removable, non-replaceable, rechargeable capacitor. The charger is built into the Shooter and requires 3
“AAA” alkaline batteries (sold separately). Use only the supplied charger provided in this iFly DUCK HUNTER package to charge the
Duck. DO NOT USE ANY OTHER SOURCE TO CHARGE THE DUCK. Install the batteries as shown.
2. Insert the 3 AAA batteries according to
the picture (shown). Ensure that the +
and – polarities match the illustrations
inside the battery compartment.
Do not fly your Duck during windy conditions or harsh weather.
You can operate your iFly DUCK HUNTER toy indoors or
outdoors. The outdoor space should be roughly 32’ x 32’ (10m
x 10m) with a height allowance of about 19’ (6m). Avoid
operating your iFly DUCK HUNTER near power-lines, trees, or
roof-tops. If flying your Duck indoors, the area should be
roughly 16’ x 16’ (5m x 5m) and the standard household ceiling
height.
3. Replace the battery compartment door
and tighten the screw using the
screwdriver. Do not over tighten.
1. Turn the Duck’s ON/OFF switch to the
OFF position for charging.
2. Turn the Shooter’s ON/OFF switch to
the ON position for charging.
3. Lift the charge-rod located at the top
front of the Shooter to the up position.
4. Locate the charge hole on the bottom
side of the Duck and insert the Shooter’s
charge rod completely. The Duck will sit
on the Shooter snugly.
5. Press and hold the charge button
located in the trigger area of the Shooter
for about 10 seconds.
The green LED charge light located near
the charge rod on the Shooter will light up
during charging.
6. Release the charge button after 10
seconds of charging the Duck. The green
LED charge light will turn off. Remove the
Duck from the charge rod on the Shooter.
7. The Duck is now ready to fly. The
charge is maintained until the ON/OFF
switch on the Duck is set to the ON
position. This handy feature allows you to
fly your Duck when YOU are ready!
8. Leave the Shooter’s ON/OFF switch in the ON position
after charging the Duck. Press the charge rod down on the
Shooter after charging. In the down position, the charge
rod is an integral part of the target sighting system.
The Duck requires 10 seconds of charging time for a flight-time of 30 to 40 seconds. Charging the Duck is a simple process as
outlined in the following steps.
CHARGING THE ifly DUCK HUNTER
CHOOSING YOUR FLYING LOCATION
WARNING! DO NOT CHARGE FOR LONGER THAN 10 SECONDS. DAMAGE MAY OCCUR TO THE CAPACITOR INSIDE THE ifly DUCK HUNTER.
INSTALLING BATTERIES
• If your shot misses the Duck, the Duck will continue to fly in it’s pre-determined path.
• If your shot hits the Duck, it will stop operating for a brief moment and appear to fall. This is meant to
simulate a glancing blow to the Duck. The Duck will resume its flight right away.
• Reload the Shooter and shoot at the duck again.
• When you shoot the Duck directly for the second time, the Duck will appear to temporarily fall again.
Normal flight will resume again momentarily.
• Reload the Shooter and shoot at the Duck again.
• When you shoot the Duck directly for the third time, it will fall from the sky.
Congratulations on your marksmanship!
• If you are unable to hit the Duck three times with the narrow infra-red beam of your Shooter the Duck
will land on the ground naturally.
FLYING AND HUNTING YOUR IFLY DUCK HUNTER
DIRECTIONAL
CONTROL TAB
LEC Light
ON
OFF
ON
OFF
DIRECTIONAL
CONTROL TAB
The Duck is ready to fly as soon as it is finished charging. The
objective of the iFly DUCK HUNTER game using single or
multiple player mode is to shoot down the Duck with the
Shooter within its 30 to 40 second flight time window. It takes 3
direct hits to bring down the Duck.
1. When you are ready to fly your fully charged Duck you
should first adjust the “direction of flight” setting to the fly pattern
of your choice. This is done by pivoting the directional control
tab to the left, center, or to the right. The directional control tab
is located at the dorsal (upper) rear end of the Duck’s body and
has the two main wings attached to it. By pivoting the directional
control tab to the left, the Duck will fly to the left and by pivoting
the directional control tab to the right, the Duck will fly to the
right. When the directional control tab is positioned in the
center, the Duck will fly straight. The farther the directional
control tab is pivoted towards a certain side, the more the Duck
will bank towards that direction during its flight.
2. Move the duck’s ON/OFF
switch to the ON position.
The wings will start to flap.
3. Gently toss the Duck into
the air. It will fly for about 30
to 40 seconds.
4. To fire at the Duck, it is necessary to reload the Shooter.
Reloading the Shooter is done by sliding the pump all the way
backwards and forwards. A reloading sound is heard if this
process is done successfully. Note: it is necessary to reload the
Shooter after each shot fired. Once the Shooter is reloaded,
you can fire a narrow infra-red beam at the Duck by pressing
the trigger button on the Shooter. A firing sound is heard.
5. When Duck has been shot down or has landed on its own,
turn it OFF to recharge it before playing again. Turning the Duck
OFF resets the system. It is not necessary to turn the Shooter
OFF before recharging the Duck. To recharge the Duck, follow
the steps outlined under “Charging the iFly DUCK HUNTER”.
6. If you are finished playing, make sure to turn the ON/OFF
switches on the Duck and on the Shooter the OFF position for
storing. It is best to remove the batteries from the Shooter if it
will be stored for a longer period of time.