PAGE 2 OF 8 6564XĆX
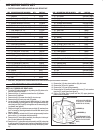
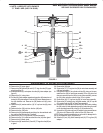
AIR MOTOR PARTS LIST
n PARTS SO MARKED ARE INCLUDED IN 61355 SERVICE KIT.
REF. DESCRIPTION (SIZE IN INCHES) QTY PART NO. REF. DESCRIPTION (SIZE IN INCHES) QTY PART NO.
V 1 Machine Screw (#8 Ć 32 x 7/8") 4 Y136Ć90ĆS
V 2 Deflector 1 90409
Deflector (model 65665Ć2B) 1 90409Ć1
V 3 Screw (#10 Ć 24 x 1/2") 6 95956827
n V 4 Machine Screw (#8 Ć 32 x 3/4") 8 Y19Ć89ĆS
n 5 Washer 8 90084
V 6 Machine Screw (1/4" Ć 28 x 3/4") 2 Y119Ć49ĆC
7 Lock Washer (1/4" i.d.) 2 Y14Ć416
V 8 Air Motor Cap 1 90078
Air Motor Cap (model 65665Ć2B) 1 90078Ć5
V 9 Valve Guide 1 90488
n 10 Gasket 1 90083Ć1
V 11 Valve Plate and Pin Assembly 1 65756
V 12 Insert Spring Assembly 1 65807
n 13 Valve Insert 1 99202
n 14 Valve Plate Gasket 1 90479
n 15 O" Ring (1/16" x 1Ć3/8" o.d.) 2 Y325Ć26
n 16 Washer 1 91344
n 17 O" Ring (1/16" x 7/8" o.d.) 2 Y325Ć18
18 Head Assembly 1 65890
Head Assembly (model 65665Ć2B) 1 65890Ć3
n 19 U" Cup (3/16" x 1Ć3/8" o.d.) 1 Y186Ć51
n 20 O" Ring (1/8" x 6" o.d.) 2 Y325Ć256
n 21 Machine Screw (#8 Ć 32 x 3/8") 4 Y136Ć85ĆS
22 Adapter 1 90111
V 23 Piston Assembly 1 61419
V 24 O" Ring (1.191" o.d.) 1 90085
25 Nut 1 90112
V 26 Valve Rod See chart, page 4
V 27 Air Cylinder See chart, page 4
28 Tube See chart, page 4
n 29 O" Ring See chart, page 4
30 Air Motor Base Assembly See chart, page 4
n 31 Valve Piston 1 92395
n 32 Valve Plate Gasket 1 90482
V 33 Valve Plate 1 90480
n 34 Pilot Insert 1 90487
V 35 Valve Guide 2 90481
n 36 Washer 1 90105
V 37 Upper Gland 1 91006
n 38 Seal 1 91007
n 39 O" Ring (.103" x 1.255" o.d.) 1 91207
V 40 Extension Rod 1 90080
41 Ground Lug 1 93006
n 42 Piston Adapter 1 92393
V 43 Lower Gland 1 90114
n 44 Washer 1 91345
n 45 O" Ring (1/16" x 7/16" o.d.) 1 Y325Ć11
46 Bolt See chart, page 4
V 47 Retaining Ring See chart, page 4
V 48 Guide Washer See chart, page 4
n 49 U" Cup See chart, page 4
50 Nut See chart, page 4
V 51 Washer See chart, page 4
V 52 Piston Rod See chart, page 4
V Smart Parts", Keep these items on hand in addition to the service kits for fast repair and reduction of downtime.
DISASSEMBLY OF AIR MOTOR
NOTE: ALL THREADS ARE RIGHT HAND.
1. Force the (23) piston assembly up by pushing the (52) piston rod toĆ
ward the top of the air motor.
2. Remove the four (1) machine screws from the (2) deflector.
3. Remove the (2) deflector.
4. Remove the six (3) screws from the (8) air motor cap.
5. Remove the (8) air motor cap and (10) gasket.
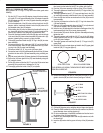
6. Loosen the eight (4) machine screws (which hold the (11) valve plate
and pin assembly, (9) valve guide, two (35) valve guides and the (33)
valve plate) until the (9 and 35) valve guides can be removed by pullĆ
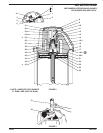
ing upward (see figure 9).
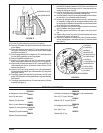
7. Remove the eight (4) machine screws and eight (5) washers from
the 6" air motor by pressing outward with a small allen wrench (see
figures 1 and 9).
8. With a screwdriver, unhook the (12) insert spring assembly from the
bottom of the (11) valve plate and pin assembly.
9. Remove the (12) insert spring assembly from the pins in the top of
the (11) valve plate and pin assembly.
10. Remove the (11) valve plate and pin assembly and (33) valve plate
by pulling upward. If they are stuck, tap the top edge lightly with a soft
face hammer or screwdriver handle (do not tap with anything metalĆ
lic).
11. Remove the (13) valve insert and the (34) pilot insert.
12. Remove the (32 and 14) gaskets.
13. Remove the (12) insert spring assembly.
14. Remove the two (6) machine screws and the two (7) lock washers
from the (37) upper gland (see figure 9).
15. Pull the (31) valve piston upward until the (37) upper gland has
pulled out of its chamber.
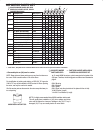
FIGURE 1
ALLEN WRENCH
(USE AN ALLEN WRENCH
TO PUSH OUT SCREWS &
WASHERS AS SHOWN.)
4 SCREWS (8)
5 WASHERS (8)
(THE REMAINING FOUR
WASHERS AND SCREWS
ARE ON THE OPPOSITE
SIDE.)


