


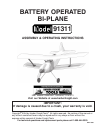

SKU 91311 For technical questions, please call 1-800-444-3353. Page 4
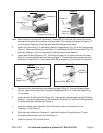
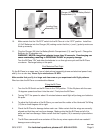
Battery/Switch
Compartment Plug (13)
Fuselage (1)
Lower Wing (11)
Figure 1
Note: Make certain to only peel off the backing. Peeling off too much will also remove the sticky
tape so that the parts will not adhere to one another. The backing should peel off easily; if it
is not coming off easily, you may be removing the backing and the tape.
3. Attach the Lower Wing (11) with Battery/Switch Compartment Plug (13) to the Fuselage-see
Figure 2. Make certain that the Lower Wing (11) with Battery/Switch Compartment Plug (13)
and the Fuselage (1) are lined up perfectly before pressing them together.
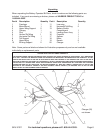
4. Locate both Bi-Wing Supports (10). The Bi-Wing Supports (10) must be set on the Lower
Wing (11) pointing forward and outward-see Figure 3. Remove the tape backing from both
sides of the Lower Wing (11) and press the Bi-Wing Supports (10) into place as in Figure 3.
Fuselage (1)
Lower
Wing (11)
Figure 2
Bi-Wing
Support (10)
Lower Wing (11)
Figure 3
5. Remove the four tape backings from under the Upper Wing (9). Line up the taped areas
with the Upper Wing Supports (3) and the Bi-Wing Supports (10). Press the Upper Wing
(9) into place.
6. Locate the two (2) Horizontal Tail Wings (12). Remove the tape backings from the Tail Wing
Platform. Line up the taped areas of the Horizontal Tail Wings (12) with the Tail Wing Support
(8) and press them into place-see Figure 4.
7. Snap the Landing Gear Assembly (15) into the slot at the front and bottom of the
Fuselage (1)- see Figure 5.
8. With one hand holding the Fuselage (1), push the Propeller (16) and Spinner (17) onto
the shaft located on the nose of the Fuselage (1).
9. Place the Decals (19) on the Bi-Plane.
Upper Wing
Support (3)
Horizontal Tail Wing (12)
Tail Wing
Support (8)
Figure 4