


Before Operating
Before using your Wagon, any part that appears damaged should be carefully checked to determine that it will
operate properly and perform its intended function.
Before operating your Big Foot Panel Wagon, check for damaged parts.
Do not over inflate the tires. Check the instructions on the tires for proper air pressure.
Inspect all parts for sharp edges before using your wagon. Great care has been taken to assure smooth
surfaces but a complete inspection before using could prevent injury.
Periodically inspect all nuts, bolts and tires to make certain that they are tight and properly inflated.
Make certain to park the Wagon on a level and secure area.
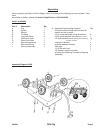
Assembly
Your Wagon comes unassembled. For assistance with assembly, please refer to the parts list and the
Assembly diagram on page 5. It is recommended that your wagon be assembled with the Tray placed over
sawhorses or sturdy cartons. This allows easy access to the wagon and protects it from damage during
assembly.
Do not use excessive force when tightening the screws, as this may result in damage to the support arms.
Step 1) With the Tray (part A) upside down so the bottom is facing upward, place it
over saw horses or sturdy cartons.
Step 2) Attach the Rear Axle Assembly (part H) to the Tray (A) using two (2) 1/2”
Bolts. Line up the Rear Axle Assembly with the holes located at the very back of
the Wagon. Insert the Bolt so that the small washers, small lock washers and cap
nuts (found in Hardware bag K) are screwed on from the underside of the wagon.
Step 3) Slide each of the Rear Axle Braces (part I) over the end of each Rear Axle until
they sit firmly to the inside of the Rear Axle Assembly (H). Line up the
end of the Braces with the holes in the wagon. Using two (2) 1/2” Bolts,
insert the bolts from the top of the wagon so that the small washers, lock washers
and the nut (part K) are secured on the underside of the wagon.
Step 4) Attach the Turntable (part D) to the Steering Assembly (part J). Attach the
Steering Assembly to the Turntable using the 1-1/8” Bolt with Hole. Slide the
Bolt through the underside of the Steering Assembly (J) and into the Turntable
(part D). Secure it from inside the Turntable with the 7/8” Washer, the Large Lock
Washer and the Hex Nut. Loosely thread the Hex Nut onto the Bolt. Insert the
Cotter Pin through the hole and spread it open.
Step 5) Attach both parts (now one assembled unit as shown in Step 4)-the Steering
Assembly (part J) and the Turntable (part D), to the Tray (A). Insert each of the
four (4) 1/2” Bolts from the top of the wagon and tighten it into place from the
bottom of the Tray with four (4) small washers, four (4) small lock washers and four nuts.
Step 6) Slide each of the four (4) Wheels (part C) onto an axle with the Air Valve facing
out. Slide two (2) 1-1/4” Washers onto each axle, one on each side of the Wheel.
After the Wheel and the Washers are in place attach the Cotter Pin to the outside
of the Wheel.
#32826 Page 3