


5
600-4-00 600596
6
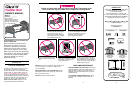
Assembling the Frame
Step 1.
Line up the side tubes and
crossbars on the floor as shown
at right. It may be helpful to
brace one side tube against
a wall or stationary object.
Holes in side tubes must face
each other.
Step 2.
Insert ends of the crossbars
into holes in the side tubes.
Assembling the
Headboard and Footboard
Step 1.
Legs have a small side hole near
one end. For each leg, push end
with side hole firmly down into
a plastic foot. Side hole must be
covered by foot. It may be
necessary to tap foot on a hard
surface to get it all the way on.
Step 2.
Assemble headboard and long
legs. Push open end of one long
leg onto plastic plug under knob
on one side of headboard.
Then push leg sideways so the
rectangular plug on lower side
of headboard goes into hole on
side of the leg.
Attach other long leg in the
same way to other side of the
headboard.
Assemble the footboard and
short legs the same way.
Step 3.
Insert a screw into the lowest
hole on each leg and into the
plastic head- or footboard.
Tighten screw securely with the
included hex wrench, but do
not over-tighten.
Repeat for other three legs.
CHECK that all four legs are
securely attached to the
head- and footboards by
pulling on the legs.
Screw
Hex
wrench
Bumps
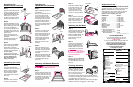
Step 1.
Begin by attaching the frame to
the footboard.
Stand the footboard at one end
of the metal frame with the
Graco
®
name facing out and
four plastic bumps of the foot-
board facing toward the frame.
Holding the footboard upright,
grasp the two side tubes as
shown and lift carefully. Rest the
ends of the side tubes on the
footboard.
Step 2.
Insert two T-nuts through the
two holes in the side tubes
and into the footboard tube as
shown. Place the bolts into the
holes on the outside of the
footboard tubes and into the
T-nuts. Tighten bolts with the
enclosed hex wrench.
Repeat on other side of the
footboard.
Step 3.
Attach the headboard in the
same way. It may be attached
with either side facing the bed.
The toddler bed will look like
illustration.
After both endboards have been
attached to the frame, use the
enclosed hex wrench to FIRMLY
TIGHTEN all eight bolts into
their T-nuts.
Attaching the
Headboard and Footboard
Attaching the Mattress Retainers
Do not use toddler bed without
mattress retainers. Mattress may slide.
Step 1.
Snap the mattress retainers onto
the center of the side tubes. The
ribs of each retainer should face
the inside of the bed frame. Line
up the holes of the mattress
retainers with the small holes
in the side tubes.
Ribs
Finishing Assembly
Place a standard full-size crib
mattressat least 51
5
/
8 inches
(131 cm) long by 27
1
/
4 inches
(69 cm) wide by 4 inches (10 cm)
thickon toddler bed frame.
The mattress must be placed so the two mattress retainers
on the frame are outside the mattress to keep it from moving.
Your toddler bed is now ready to use.
REMINDER: Regularly inspect the toddler bed for damaged
hardware, loose joints, missing parts, or sharp edges.
87
T-nut
Step 1.
There are left and right bed rails.
When installed correctly, the note
on the bed rails, THIS SIDE
MUST FACE MATTRESS, will
be to the inside of the bed.
Snap bed rails on bed side
tubes as shown.
Step 2.
Lift bed rails and slide them to
the inside of the headboard.
Snap to headboard as shown.
Mattress retainer will fit in the
recessed area in the bed rails.
Be sure bed
rails are secure. Bed rails must
be attached to headboard on
the inside of the post.
Step 3.
Repeat on other side. Both bed
rails must be used. Do not rely
on wall to keep child in bed. See
warnings.
Step 2.
Fasten each mattress retainer
to side tubes with one T-nut
and bolt. The T-nut must be
on the inside of the frame.
Tighten the bolts and T-nuts
with the hex wrench provided.
Step 3.
Position mattress support with
printed side up as shown. Fold
edges down at creases, and
place on bed so notches in
edges fit over the crossbars.
Hex wrench
Bolt
Attaching the Bed Rails
Mattress
retainer
Replacement Parts
Instructions for ordering toddler bed parts:
Complete form below. Your toddler bed model number
MUST be included on the form to ensure proper
replacement parts. Your model number can be found
on the label on the side tube of your toddler bed.
Payment must accompany your order.
Parts List:
Side tube..................................
Crossbar...................................
Long leg....................................
Short leg...................................
Foot..........................................
Hardware..................................
Mattress support.......................
Mattress retainer.......................
Headboard................................
Footboard.................................
Left bed rail (as seen from
behind headboard)...............
Right bed rail (as seen from
behind headboard)...............
Price:*
$ 8.00 (each)
$ 5.00 (each)
$ 7.00 (each)
$ 5.00 (each)
$ 5.00 (set of 4)
$ 5.00
$10.00
$ 5.00 (each)
$12.00
$12.00
$10.00
$10.00
* Prices subject to change without notice.
Fold edges
down
Side hole
T-nut
Bolt
Hex
wrench
Return the form below with payment to:
GRACO CHILDRENS PRODUCTS INC.
CUSTOMER SERVICE DEPARTMENT
P.O. BOX 100, MAIN STREET
ELVERSON, PA 19520
IF YOU NEED HELP
If you have any questions or if you need
any part not listed, please call toll-free:
1-800-345-4109
or visit our Internet website, www.gracobaby.com.
SHIP TO:
Name
Address
City, State, Zip
( )
Telephone
Check enclosed
(payable to Graco Childrens
Products Inc.)
Charge to credit card:
Visa
MasterCard
Discover
Account #:
Expiration date:
Signature:
Side tube
Crossbar
Long leg
Short leg
Foot
Hardware
Mattress support
Mattress retainer
Headboard
Footboard
Left bed rail
Right bed rail
Subtotal:
Shipping
& handling*: $5.00
6% sales tax
(PA only):
Total:
*$15.00 outside the continental U.S.
Model No. (required)
Serial No. (required)