


8910
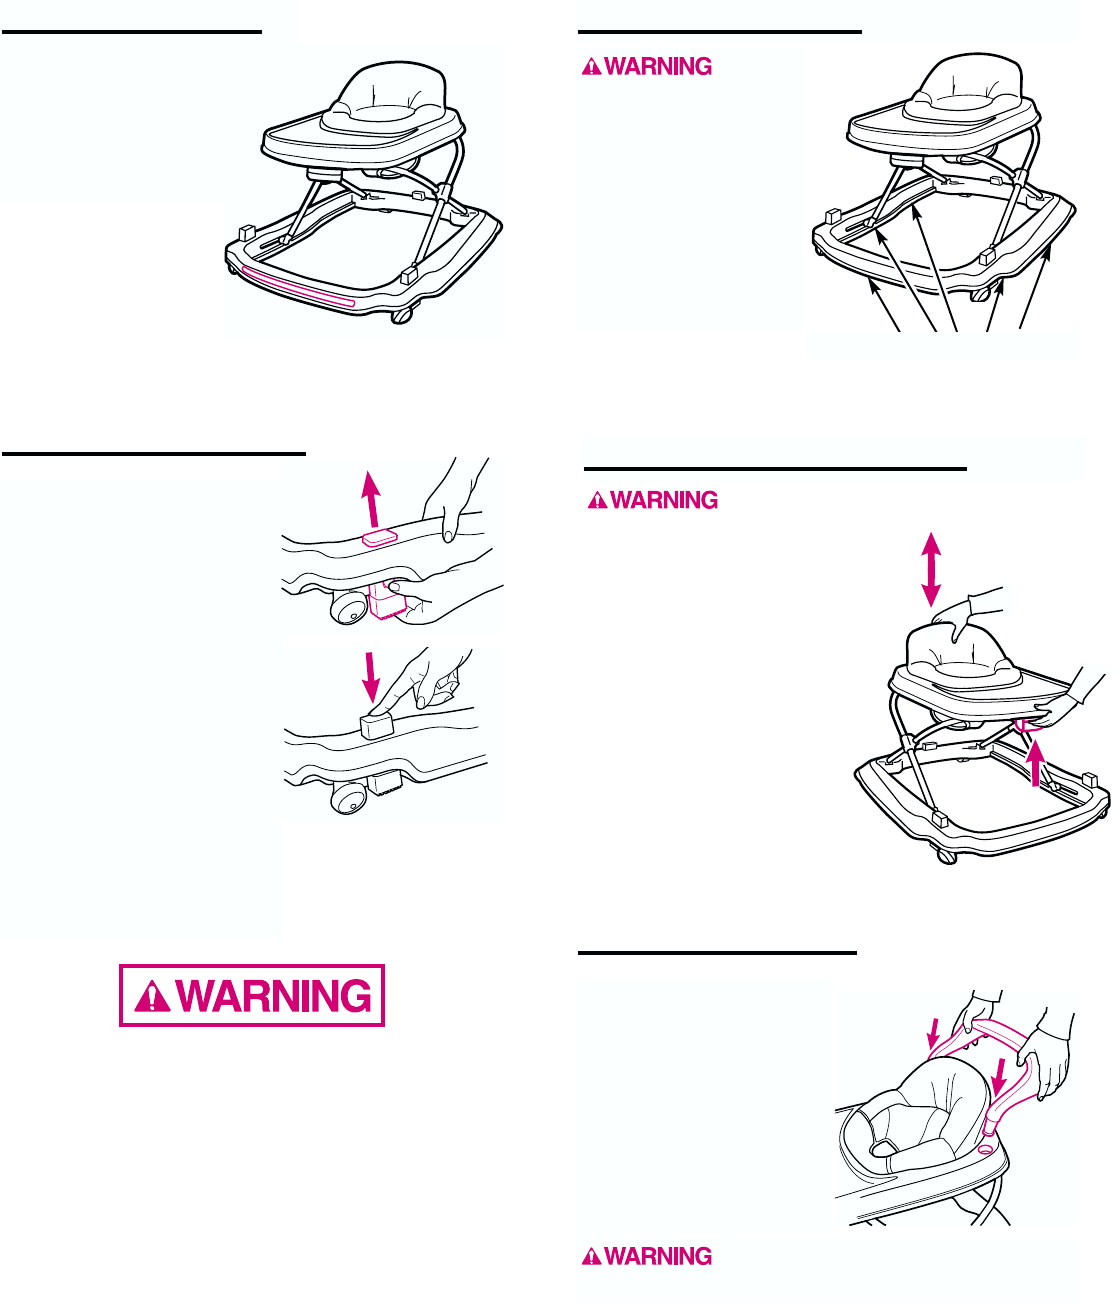
To install parking stands (two
in the front, one in the back),
lift base slightly, depress
button on front of stands and
push stands up until they
snap into place.
To use parking stands, lift base
slightly and push stands down
until they snap into place.
To release parking stands,
lift base slightly and depress
button on front of stands.
Push stands upward into
storage position.
!!
When parking stands are in use, it is still possible
!!
for your child to move the activity center.
!!
Be sure to engage both parking stands.
!!
Never place the activity center on a table or
!!
countertop.
To Use Parking Stands
Remove
your child from the
activity center before
making any adjustments.
To raise or lower your
activity center:
Push up button at front of
tray as shown and hold it.
Push down or pull up while
adjusting to desired height.
Tray should lower easily.
DO NOT force tray down
or unit could be damaged.
To Adjust the Activity Center
Avoid
serious injury or death.
DO NOT use product
without the five friction
strips under the base.
!!
Make sure strips are
!
kept clean.
!!
Clean strips with
!
WATER ONLY.
Friction Strip Feature
Caring for the Activity Center
Make sure five friction strips under base are kept
clean. Clean with water only.
To wash fabric seat, unhook the eight grommets
under tray and lift seat off. Machine wash in
lukewarm water on delicate setting and drip dry.
NO BLEACH.
For cleaning metal and plastic parts other than
friction strips, use only household soap or
detergent and warm water. NO BLEACH.
Excessive exposure to sun or heat could cause
fading or warping of parts.
Friction strips under base
Line up the pegs on the
bottom of the spoiler with
the two holes at the back of
the activity center and push
the spoiler in until it snaps
in place. It will not be
removable.
Do not allow spoiler to
block seat by inserting it
backwards.
To Attach the Spoiler
Avoid falls and other hazards. Never
allow unit to be pushed while child is in product.
Step 1.
With the playtray upside down, insert two AA batteries
(we recommend alkaline disposables) into the bottom of
the playtray following the molded directions for placement.
CHECK that the batteries are put in correctly. Your
playtray will not function if the batteries are put in
backwards.
Step 2.
To attach the battery
compartment door, line
up the tabs and set the
door in place as shown.
Step 3.
Close the door and tighten
the attached screw to hold
door closed.
Step 5.
Fasten the playtray to the
activity center by placing
it on the front of the tray
as shown and snapping
the two mounting hooks
onto the activity center
tray. CHECK that the
playtray is securely
fastened to the activity
center tray.
To Assemble the Playtray
Before assembling, check that you have all the
parts listed below:
Playtray
Playtray mounting
hooks (2)left and
right are not the same
Screw (4)
DO NOT lift this product by the playtray.
Door
Keep the batteries out of childrens reach.
Any battery may leak battery acid if mixed with
a different battery type, if inserted incorrectly
(put in backwards) or if all batteries are not
replaced or recharged at the same time.
Any battery may leak battery acid or explode
if disposed of in fire or an attempt is made to
charge a battery not intended to be recharged.
Never recharge a cell of one type in a
recharger made for a cell of another type.
Discard leaky batteries immediately. Leaky
batteries can cause skin burns or other
personal injury. When discarding batteries, be sure to dispose
of them in the proper manner, according to your state and
local regulations.
Always remove batteries if the playtray is not going to be used
for a month or more. Batteries left in the unit may leak and
cause damage.
FOR SAFE BATTERY USE:
Recommended type batteriesalkaline disposables, size AA.
NEVER mix battery types.
Change batteries when playtray ceases to operate satisfactorily.
Replacement Parts
Instructions for ordering activity center parts:
Complete form below. Your activity center model
number MUST be included on the form to ensure
proper replacement parts. Your model number can
be found on a sticker on the underside of the tray.
Payment must accompany your order.
Return the form below with payment to:
GRACO CHILDRENS PRODUCTS INC.
CUSTOMER SERVICE DEPARTMENT
P.O. BOX 100, MAIN STREET
ELVERSON, PA 19520
IF YOU NEED HELP
If you have any questions or if you need any parts
not listed, please call toll-free:
1-800-345-4109
or visit our Internet website, www.gracobaby.com.
Model Number
(Must be filled in)
SHIP TO:
Name
Address
City, State, Zip
( )
Telephone
Account #:
Expiration date:
Signature:
Total:
Shipping
& handling*: $5.00
6% sales tax
(PA only):
Total amount
due:
*Outside the continental U.S., please
call for shipping cost.
Seat
Seat back
Caster
Rear wheel
Parking stand
Skid strip
Pin
Playtray
Mounting hooks
Spoiler
Parts List:
Seat ...................................
Seat back ...........................
Caster ................................
Rear wheel ..............................
Parking stand ....................
Skid strip ...........................
Pin .....................................
Playtray ...............................
Mounting hooks (both) .........
Spoiler ..................................
Price:*
$13.00
$ 5.00
$ 5.00 (each)
$ 8.00 (each)
$ 5.00 (each)
$ 5.00 (each)
No charge
$20.00
$ 5.00
$ 7.00
* Prices subject to change without notice.
Check enclosed
(payable to Graco Childrens
Products Inc.)
Charge to credit card:
Visa
MasterCard
Discover
7
308-2-00 308999
11
Step 4.
Attach the right and left
mounting hooks to the
underside of the playtray
with the four screws
provided. The mounting
hooks will only fit one
way.
To Attach the Decal
Place decal on front of
the base as shown. Rub
over decal with hand
or clean cloth to
assure adhesion.