


5
226-10-99 IS3556
6 87
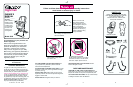
Assembling
the Highchair
Step 1.
Hold front tube with ends up.
Place a foot (smooth side up)
at one curved corner of tube.
Insert a screw through tube
and into foot, then tighten.
Repeat with other corner
and both feet of rear tube.
Step 2.
Lay seat face down on the
floor as shown. Insert
support tube through both
collars on bottom of seat.
Step 3.
Mount a slider onto
each end of the
support tube. Slider
loops should be
facing UP, as shown.
Push end of slider
all the way into collar.
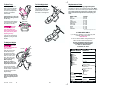
Step 4.
Insert both ends of upper
tube into slider loops and
pull all the way through as
shown.
Still holding ends of tube,
locate pegs. Push pegs
through the channel until
they pass the snap. Slide
pegs into first notch of
height-adjustment track.
Step 5.
Hold rear tube as shown.
Slide plastic brackets onto
upper tube.
Step 6.
Slide front tube onto upper
tube as far as it will go, until
the holes in the tubes line up.
Step 7.
Pull rear tube up until holes
in plastic bracket line up with
holes in the tubes.
CHECK that holes in upper
tube, front tube AND plastic
brackets all line up with each
other.
Insert a T-nut into one plastic bracket hole. It must pass
through both tubes, as shown enlarged below. Insert a
screw into other side of plastic bracket and screw it
into T-nut.
CHECK that tubes are securely connected by trying to pull
them apart.
Repeat for other plastic bracket.
Step 8.
Place seat pad in seat as
shown. Insert tabs of seat
pad into the corresponding
slots in the seat. From rear
of seat, hook all four tabs
over plastic anchors.
To Use Seat Belt
Step 1.
Snap buckle together as
shown. Adjust belt as needed
to get a snug fit around
your child.
Step 2.
Press on prongs at top and
bottom of buckle to release.
Collars
Support tube
Pegs
First notch of
height adjustment track
Both U
curves up
U curve
down
Plastic bracket
Set highchair upright.
It should look like this.
Prevent serious injury or death from falls
or sliding out. Always secure your child in the restraint.
Do not depend on the tray alone to hold your child.
If it becomes necessary to remove the seat belt,
follow these instructions:
Step 1.
First buckle the belt.
Then unthread end of
seat belt through the
buckle as shown.
Step 2.
Pull other end of the seat
belt through the belt retainer
as shown.
Step 3.
To rethread buckle, thread
the free end of the waist belt
back through the belt retainer.
The GRACO logo must be
on the front of the buckle.
Step 4.
Thread belt through
the buckle as shown.
The left end of the buckle
must be smooth side up
to thread the belt in the
buckle properly. The
other side of the buckle
has teeth.
If you have difficulty getting
the belt into the buckle, check
to make sure that the smooth
side of the buckle is up.
CHECK that the belt is
threaded correctly by pulling
on the seat belt. The belt
should not slip through
the buckle.
Smooth side