


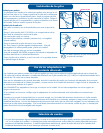

Low Battery Indication
Parent Unit
• When the battery is low in the parent unit, the LED bar on the side of the unit will change from green to red and you will
hear a series of 3 audible beeps every 5 seconds. If operated too long on a low battery, you may also experience a poor
signal and the connection LED on the front of the parent unit may change from green to red and you will begin to hear a
continuous audible beep from the Parent Unit.
• You may either turn off the unit or plug in the A/C adapter to recharge the batteries.
Nursery Unit
• When the batteries are low in the Nursery Unit, the power LED will change from green to red. You may also experience a
poor signal and the connection LED on the front of the Parent Unit may change from green to red and you will begin to
hear the Parent Unit beep.
• You may either turn off the unit, plug in the A/C adapter or replace the batteries.
Out of Range Indication
• If the Parent Unit begins to lose the signal from the Nursery Unit, the connection LED (bottom Sound Light LED) will change
from green to red. Additionally, a continuous audible beep will be generated to warn the user that the connection to the
Nursery unit has been lost.
• Immediately move the Parent Unit closer to the Nursery Unit to regain connection.
• Once connection has been re-gained, the connection LED will change from red to green and the audible beep will stop.
***Note: It is not uncommon for the Parent Unit to occasionally lose and regain connection with the Nursery
Unit in environments that have a significant amount of obstructions.
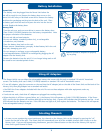
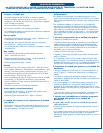
Setting Up the Baby Monitor
4
***NOTE: It is very important that the steps below be followed for first time power-up.
1. For optimum operation, it is best to charge the batteries in the Parent Units for at least 16 hours prior to use. The rechargeable
batteries need to be installed into the Parent Unit before charging - refer to the “Battery Installation” section. DO NOT turn on
power while the unit is charging for the first time.
2. Place the Nursery Unit within 10 feet (3 meters) of your baby. Plug an AC adapter into the jack on the back of the Nursery Unit.
Plug it into a working 120 volt AC outlet.
3. Aim the Nursery Unit toward your baby. Check that there are no walls or large objects that could block sound transmission.
4. Place the Parent Unit within five (5) feet (1.5 meters) of the Nursery Unit and turn on the Parent Unit using the On/Off switch
on the side of the unit. All of the Sound Light LEDs will illuminate, and the bottom LED will be red. You will also hear a single
audible beep.
5. Turn on the Nursery Unit using the On/Off switch on the side. The green power light should come on.
6. Within a few seconds, the Parent Unit will lock on to the Nursery Unit and the top four (4) green LEDs will shut off.
A second later, you will hear a series of beeps and the connection LED should change from red to green. Your monitor is now
ready for use.
It is VERY IMPORTANT to test the system when first set up, and at regular times thereafter. Test the units if you
suspect they may have been damaged or have not been used for a long time.
1. If two adults are present, have one take the Parent Units to different locations, trying various volume settings, while the
other speaks into the Nursery Unit.
2. If only one adult is available, place a ticking clock, radio, or other sound-producing device near the Nursery Unit to test it.
3. When testing, keep the level of your child’s sounds in mind, and adjust the volume accordingly.
4. If there is sound interference, switch the Nursery Unit and the Parent Units to the other channel setting.
Testing the System