


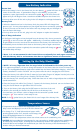
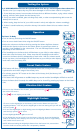


Low Battery Indication
Parent Unit
• When the battery is low in the Parent Unit, the low battery symbol will show in the
center of the LCD screen. If operated too long on a low battery, you may also
experience a poor signal and the no connection symbol on the LCD screen will
appear and you will begin to hear a continuous audible beep from the Parent Unit.
• You may either turn off the unit or plug in the A/C adapter to recharge the batteries.
Nursery Unit
• When the batteries are low in the Nursery Unit, the power LED will change from
green to red. You may also experience a poor signal and the no connection symbol
on the LCD screen on the front of the Parent Unit may change and you will begin to
hear the Parent Unit beep.
• You may either turn off the unit, plug in the A/C adapter or replace the batteries.
Out of Range Indication
• If the Parent Unit begins to lose the signal from the Nursery Unit, the no connection
symbol on the LCD screen will appear. Additionally, a continuous audible beep will
be generated to warn the user that the connection to the Nursery Unit has been lost.
• Immediately move the Parent Unit closer to the Nursery Unit to regain connection.
• Once connection has been re-gained, the connection symbol will change to
and
the audible beep will stop.
***Note: It is not uncommon for the Parent Unit to occasionally lose and regain connection
with the Nursery Unit in environments that have a significant amount of obstructions.
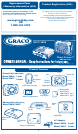
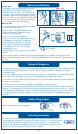
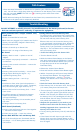
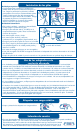
Setting Up the Baby Monitor
***NOTE: It is very important that the steps below be followed for first time power-up.
1. For optimum operation, it is best to charge the batteries in the Parent Units for at least 16 hours prior
to use. The rechargeable batteries need to be installed into the Parent Unit before charging - refer to the
“Battery Installation” section. DO NOT turn on power while the unit is charging for the first time.
2. Place the Nursery Unit within 10 feet (3 meters) of your baby. Plug an AC adapter into the jack on the
back of the Nursery Unit. Plug it into a working 120 volt AC outlet.
3. Aim the Nursery Unit toward your baby. Check that there are no walls or large objects that could block
sound transmission.
4. Place the Parent Unit within five (5) feet (1.5 meters) of the Nursery Unit and turn on the Parent Unit
using the On/Off button on right side of the LCD screen.
5. Turn on the Nursery Unit using the On/Off button on the front of the unit.
6. Within a few seconds, the Parent Unit will lock on to the Nursery Unit.
A second later, you will hear a series of beeps and the connection symbol should
change to . Your monitor is now ready for use.
NOTE: If the symbol shows, the Parent Unit is out of range of the Nursery Unit.
4
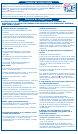
• Temperature sensor measures the temperature of the
baby's room and displays it on the LCD of the Parent Unit.
• To change °F to °C, hold Volume down button while
pressing power button for 2 seconds until it beeps, then
press the NightLight button for 2 seconds.
Temperature Sensor
• NOTE: DO NOT put temperature sensor near a heat source or air conditioning vent.
• NOTICE: We have added the thermometer for your convenience. Ambient temperature readings may
be affected by various factors, including (but not limited to) location with respect to windows,
electrical devices and sunlight. We recommend you check the accuracy of the thermometer in its
location with your home thermometer.