


12 308049
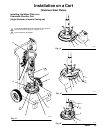
Installation on a Cart
(Stainless Steel Plates)
Installation
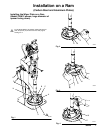
Reference letters and numbers in the text refer to Figs.
13–16 and the Parts Drawing on page 16.
WARNING
MOVING PARTS HAZARD
Moving parts can pinch or amputate your
fingers. When the pump is operating and
when raising or lowering the ram, keep
your fingers and hands away from the priming
piston and the lip of the fluid container.
WARNING
To reduce the risk of serious injury whenever you
are instructed to relieve pressure, always follow the
Pressure Relief Procedure on page 5.
1. Relieve the pressure.
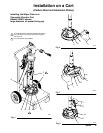
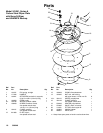
2. Install the wiper plate (A) onto the pump intake (B),
with the wiper plate vent handle (C) facing the left
of the cart. Secure by tightening the setscrews
(17). See Fig. 13.
3. The wiper plate is supplied for use with 19 liter (5
gallon) straight sided pails on a ram. It must be
modified for use with the pneumatic elevator cart.
See steps a and b following.
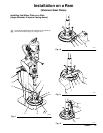
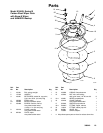
a. To use the wiper plate with straight sided
pails, the large spacer (8) must be inverted.
Working from the bottom, use a screwdriver to
pry the spacer loose. Work it upward so it is
completely above the flange (D) of the wiper
plate. See Fig. 14. Next, by hand, angle the
spacer and work it off the plate, pulling it down
over the flange and bottom wipers (E). See
Fig. 15. Turn the spacer so the large diameter
is facing up. Work the spacer up over the
wiper plate by hand, so it is completely above
the flange (D) of the wiper plate. Working from
the top, use a screwdriver to position the
spacer between the flange (D) and the wipers
(E). See Fig. 16.
b. To use the wiper plate with tapered pails,
the large spacer (8) must be removed. Work-
ing from the bottom, use a screwdriver to pry
the spacer loose. Work it upward so it is com-
pletely above the flange (D) of the wiper plate.
See Fig. 14. Next, by hand, angle the spacer
and work it off the plate, pulling it down over
the flange and bottom wipers (E). See Fig. 15.
Save the spacer, as it is required for other
applications.
4. Install Cart Accessory Kit 224376. See 308199 for
details.
5. Refer to the separate cart and pump manuals for
set-up and operating instructions.
Operating the Air Assist Valve Handle
The cart’s air assist toggle valve (G) directs air under
the wiper plate, making it easier to pull the plate out of
the pail. Refer to manual 308199 for instructions on
changing pails using the air assist valve.
For the air assist valve to function, you must open a
passage for the air with the valve handle (J). Practice
using the handle a few times, until you are familiar with
its use.
WARNING
To reduce the risk of serious injury whenever you
are instructed to relieve pressure, always follow the
Pressure Relief Procedure on page 5.
1. Relieve the pressure.
2. To open a passage for air to get under the plate,
rotate the handle (J) 45_ clockwise and pull it
upward (it should travel about 13 mm [1/2 in.] up
and down).
3. To close the air passage, push the handle (J) down
and rotate it 45_ counterclockwise to lock.
Maintenance
If the wiper plate does not come out of the pail easily
when the pump is being raised, the air assist tube (F),
elbow (H), or valve (J) may be plugged. A plugged
valve prevents air from reaching the underside of the
plate to assist in raising it from the pail.
WARNING
To reduce the risk of serious injury whenever you
are instructed to relieve pressure, always follow the
Pressure Relief Procedure on page 5.
Relieve the pressure. Refer to the Parts Drawing on
page 16 and disassemble the air assist valve (J) as
shown. Clear the hose (F) and the elbow (H) in the
wiper plate. Clean all parts of the valve, and reas-
semble.