


Notes:
•Installation of the tether anchor may require two adults.
•If your vehicle is a model year 2000 or newer, it
probably has a factory installed tether anchor. Please
see your vehicle owner’s manual.
If your vehicle was manufactured in or after 1985,
Fisher-Price
®
recommends that you contact your vehicle
dealer to obtain a tether anchor kit that is specifically
designed for your vehicle. Most vehicle manufacturers
supply these kits free of charge. When requesting a
tether anchor kit, be sure to specify the vehicle seating
location in which you intend to install the car seat. To
determine the seating location that provides a tight fit
for your car seat, pre-install the car seat in your vehicle.
Follow the instructions in your Futura 20/60
TM
Owner’s
Manual, (“Installing Your Car Seat in a Vehicle”),
beginning on page 24.
If your vehicle was manufactured before 1985 or a tether
anchor kit is not available for your particular vehicle, use
the universal tether anchor provided in this kit and refer
to the instructions that follow in this section to install the
tether anchor.
Hint: Refer to your vehicle owner’s manual for information
on tether straps. Look for “tether” or “top strap” in the
seat belt/restraint section.
Before you install your tether anchor…
Choose an acceptable vehicle seating location for
the car seat. Follow the instructions in your Futura
20/60
TM
Owner’s Manual, “Selecting a Vehicle
Seating Location” pages 14 and 15 for general
information on choosing a vehicle seating location.
To determine the seating location that provides
a tight fit for your car seat, pre-install the car seat
in your vehicle. Follow the instructions in your
Futura 20/60
TM
Owner’s Manual, (“Installing Your
Car Seat in a Vehicle”), beginning on page 24.
You also need to choose an acceptable location for
the tether anchor. Make sure the location is:
- through solid metal,
-1
1
/
4
" away from any edge or large hole (speaker
holes, defroster vent holes, etc.),
- clear of wires, fuel or brake lines,
- accessible to allow the attachment of a washer
and nut,
- NOT a removable panel, luggage cover, spare tire
cover or any screw-on panel.
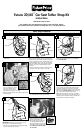
Determine which type of vehicle you have: 2-door
or 4-door car; van, station wagon, hatchback;
sport utility vehicle or pick-up truck.
3"
3"
Washer
Lock Nut
Car Seat
Center Line
Anchor
Bolt
•If a pre-drilled hole does not exist, you will have to drill
a
5
/
16
" hole. (Be sure to wear appropriate eye protec-
tion when drilling.) Make sure the hole is at least 8"
away from the top and no more than 3" from the
center line of the car seat.
•Insert the bolt through the anchor.
•Insert the end of the bolt into the hole inside
your vehicle.
•Open the trunk of your vehicle and attach the washer
and lock nut to the end of the bolt. While holding the
bolt tight with a wrench, tighten the lock nut securely
with another wrench.
4"
4"
Washer
Anchor
Bolt
Car Seat
Center Line
•If a pre-drilled hole does not exist, you will have to
drill a
5
/
16
" hole. (Be sure to wear appropriate eye
protection when drilling.) Make sure the hole is behind
the vehicle seat and still accessible by the tether strap;
and no more than 4" from the center line of car seat.
•Insert the bolt through the anchor.
•Insert the end of the bolt into the hole inside
your vehicle.
•From the outside or underside of your vehicle, attach
the washer and lock nut to the end of the bolt. While
holding the bolt tight with a wrench, tighten the lock
nut securely with another wrench. If the drilled hole is
on the floor of your vehicle, use a silicone caulk to seal
out water and exhaust fumes.
3"
3"
Washer
Lock Nut
Anchor
Bolt
Car Seat
Center Line
•If a pre-drilled hole does not exist, you will have to
drill a
5
/
16
" hole. (Be sure to wear appropriate eye
protection when drilling.) Make sure the hole is at least
8" from the top of the vehicle seat and no more than
3" from the center line of the car seat.
•Insert the bolt through the anchor.
•Insert the end of the bolt into the hole inside
your vehicle.
•From the outside of your vehicle, attach the washer
and lock nut to the end of the bolt. While holding the
bolt tight with a wrench, tighten the lock nut securely
with another wrench. Use a silicone caulk around the
drilled hole to seal out water and exhaust fumes.
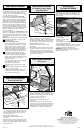
Follow the instructions in your Futura 20/60™ Car Seat
Owner’s Manual to install your car seat, beginning on
page 24. After you complete step 10 on page 32, follow
these instructions.
TO REMOVE
Free End
Tether Strap Hook
Tether Strap
Anchor
Tab
•Attach the tether strap hook to
the tether anchor.
•Pull the free end of the tether
strap to tighten.
•Fold or roll the excess tether strap and tuck it between
the car seat and the vehicle seat.
•To remove the tether strap from the tether anchor, lift the
tab on the adjuster to loosen the tether strap. Remove
the tether strap hook from the tether anchor.
IMPORTANT! Refer back to your Futura 20/60™ Car
Seat Owner’s Manual, page 33, step 10 to test your
installation of the car seat.
Questions? We’d like to hear from you!
Call Fisher-Price
®
Consumer Affairs, toll-free at
1-800-432-KIDS, 8 AM - 5 PM EST Monday through Friday.
Hearing-impaired consumers using TTY/TDD equipment,
please call 1-800-382-7470. Or, write to:
Fisher-Price
®
Consumer Affairs, 636 Girard Avenue,
East Aurora, New York 14052.
Fisher-Price, Inc., a subsidiary of Mattel, Inc., East Aurora, NY 14052, U.S.A.
©2000 Mattel, Inc. All Rights Reserved. ® and ™ designate U.S. trademarks of Mattel, Inc.
Printed in U.S.A. 79013-0928
Tether Anchor Installation
1
2
3
Tether Anchor Installation
2-Door and 4-Door Car
Distance from
top of car
seat and hole
is at least 8".
Tether Anchor Installation
Van, Hatchback, Station Wagon,
Sport Utility Vehicle
Hole is
behind
vehicle seat
and still
accessible by
the tether strap.
Lock Nut
Tether Anchor Installation
Pick-Up Truck
Distance from
top of vehicle
seat and hole
is at least 8".
Installing Your
Car Seat in a Vehicle