


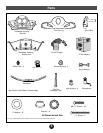


Assembly
9
3
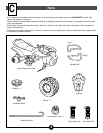
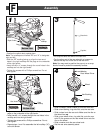
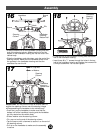
• Position the vehicle body upside down.
Note: The mudflaps are marked “R” and “L” to designate
right and left.
• With the “R” marking facing up, align the two round
holes in the right mudflap with the pegs on the underside
of the right fender.
• Insert two #8 x
3
/4" screws through the round holes in the
mudflap and into the right fender.
• Tighten the screws with a Phillips screwdriver. Do not
over-tighten.
Bottom View
Right
Mudflap
Right Fender
Peg
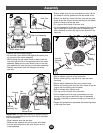
• Align the two oval holes in the right mudflap with the
pegs on the underside of the right fender.
• Insert two #8 x
3
/4" screws through the oval holes in the
mudflap and into the right fender.
• Tighten the screws with a Phillips screwdriver. Do not
over-tighten.
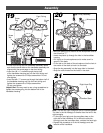
• Repeat steps 1 and 2 to assemble the left mudflap (“L”)
to the left fender.
• Fit a cap nut onto one end of the rear axle.
• Tap the other end of the rear axle with a hammer to
secure the cap nut on the end of the rear axle.
Note: You may want to position the cap nut on a scrap
block of wood to protect the assembly surface.
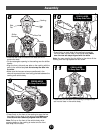
• Slide a hubcap, inside surface up, onto the rear axle.
• Slide a hex bushing, ring side first, onto the rear axle.
• Slide a wheel onto the rear axle. Make sure the ribs on
the wheel face up.
• Slide a rear wheel driver, ring side first, onto the rear
axle. Fit the grooves on the rear wheel driver onto the
ribs on the wheel.
• Slide a washer onto the rear wheel axle.
• Set the rear axle assembly aside.
2
1
Bottom View
Right
Mudflap
4
Round Hole
Oval Hole
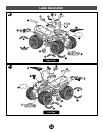
Rear Axle
Cap Nut
Washer
Wheel
Hex Bushing
Rear Wheel Driver
Hubcap
F