


ENGLISH
8
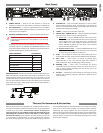
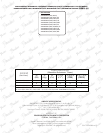
Front Panel
NOTE: The TUNER OUT {S}, POWER AMP IN and PRE AMP OUT {T} jacks are balanced TRS (Tip/Ring/Sleeve) type jacks,
with tip=positive (+), ring=negative (–) and sleeve=ground (GND). While standard shielded TS (Tip/Sleeve) “mono”
guitar cables can certainly be used, the use of “stereo” TRS cables may improve signal-to-noise ratio and reduce hum
due to line noise.
Thank you for choosing the Fender® Bassman® 500 watt hybrid (tube
preamp + class-D power amp) bass head. This amplifier was designed
to provide the ultimate bass playing experience, with two channels
(Vintage/Overdrive), classic good looks and modern technology
designed to maximize classic technology.
The Vintage channel offers a classic Fender passive tone stack. This "cut-
only" interactive circuit provides a distinctly old-school caramel-like
thickness to the notes. The Overdrive channel has an active tone stack,
very quick and responsive, with the ability to get incredibly aggressive.
Foot switch between these on stage for an instant tone make-over.
Silent recording is easy. Simply disconnect any connected speaker cabi-
net and capture the Preamp tone out of the XLR output without waking
the neighbors!
The Bassman 500 will provide a lifetime of thick, natural, balanced tone
that sits fat in your live or studio mix. Enjoy!
PRODUCT REGISTRATION
—
Please visit: www.fender.com/product-registration
A. INPUTS Plug your bass into the input that sounds
the best to you! input "" is a lower sensitivity input (–db) and
provides cleaner response with high-output or active instruments.
if both inputs are used simultaneously, their input sensitivities
become identical, both –db.
B. VOLUME Adjusts the volume level of the Vintage channel.
C. BASS / MID / TREBLE Classic, cut-only (passive) tone stack.
Pull the BASS knob out for emphasis in the low-frequency range
(DEEP). Pull the TREBLE knob out for an increase in the high-
frequency range (BRIGHT).
D. CHANNEL SELECT Selects the active channel as indicated by
the green and red LEDs. When the VINTAGE channel is selected
(switch in the down position, green LED), the knobs on the left
{B–C} are active. When the OVERDRIVE channel is selected (switch
in the up position, red LED), the knobs on the right {E–J} are active.
The included Footswitch can also be used to select channels. See
FOOTSWITCH {R} on next page.
E. GAIN Adjusts the amount of preamp tube distortion in the
overdrive channel.
F. BLEND Controls the amount of distorted signal (set by GAIN) to
be blended with the clean bass signal. Lower settings can maintain
a cleaner tone, with some added grit. Higher settings will produce
more distorted tones and add sustain. Set to "" for clean tube bass
signal only.
G. VOLUME Adjusts the volume level of the Overdrive channel.
Use together with the GAIN knob {E} to set the overall loudness of
the Overdrive channel.
H. BASS Adjusts the amount of low-frequency boost or cut
(±dB) of the Overdrive channel. Set this knob to the center
detent position for flat bass response. Pull this knob out for low-
frequency emphasis (DEEP).
I. MID FREQ / MID LEVEL Use the FREQ knob to set the
frequency at which the LEVEL knob adjusts the middle-frequency
boost or cut (±dB) of the Overdrive channel. Set the LEVEL knob
to the center detent position for flat mid response.
It is easiest to adjust MID when the LEVEL control is at its maxi-
mum or minimum, so that the effect of the FREQ knob is more
easily heard. Once the proper FREQ setting is found, adjust the
LEVEL knob to the desired setting.
J. TREBLE Adjusts the amount of high-frequency boost or cut
(±dB) of the Overdrive channel. Set this knob to the center
detent position for flat treble response. Pull this knob out for a
high-frequency boost (BRIGHT).
K. MASTER Adjusts the overall volume of the amplifier. Pull this
knob out to mute all outputs from the amp except the TUNER
output, useful for silent instrument tuning.
Bassman amps are equipped with Fender's Delta-Comp™ limiter.
Setting the MASTER level higher or playing more aggressively will
result in more compression and sustain!
L. PEAK This LED illuminates when the amplifier is producing
maximum peak power (reaching the limiter threshold). To avoid
overheating the class-D power amplifier, reduce the output level
to where the PEAK LED is flashing during playing rather than being
on continuously for extended periods.
M. PROTECT This LED illuminates when the class-D amplifier
has gone into protect mode due to exceeding safe operating
temperature or maximum current limit (i.e. operating at -ohms).
This LED also illuminates briefly during power on. The speaker
output will be muted when this led is on.
N. POWER INDICATOR Illuminates when power to the unit is
switched on.