


instructions
Drive Slings are made to support a patient during lift and
transfer procedures. The slings are reinforced at all points of
attachment to ensure maximum safety. The sling fabrics resist
deterioration from exposure to moisture and laundering.
FABRIC
The outer side of the sling features a “handle” for assistance in
positioning the patient in a wheelchair, commode, etc.
CAUTION: Always place the sling under the patient with the
handle away from the patient. Laundering should be done with
dark colors. Refer to the washing instructions on the
sling label.
Full Body Slings are constructed with a high back section that
provides additional support for the head and neck and a pad-
ded under thigh section for added comfort.
POSITIONING THE FULL BODY SLING ON THE MATTRESS
1. Position the patient in the center of the bed and laying
flat on his/her back.
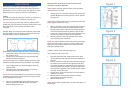
2. Fold the sling in half (length wise) and place the sling
beside the patient.(see figure 1)
NOTE: The closed end or commode opening of the sling with
positioning handle should be facing the patient when folded.
1. The top edge of the sling should be slightly above the
patient’s head.
2. The bottom edge of the sling should be a few inches
above the back of the patient’s knees.
NOTE: Drive recommends that two (2) assistants be used when
positioning the patient on a sling. The bed rails may be raised
to minimize patient movement.
3. With one (1) assistant holding the patient, the second
assistant pushes the folded sling under the patient
without rolling him/her over.
POSITIONING THE PATIENT ON THE SLING WITH OR
WITHOUT COMMODE OPENING
NOTE: Use the following method to easily move the patient
and avoid strain to yourself.
1. If the patient is to roll to their Left Side, then elevate the
patient’s Right Knee until the right foot is flat on the bed
(see figure 2).
NOTE: Drive recommends that two (2) assistants be used when
positioning the patient onto a sling.
1. With an assistant on each side of the bed and up against
the mattress, the assistant on the left hand side of the
bed will position his/her right hand on the elevated knee
and his/her left hand under the patient’s right shoulder,
slowly push on the knee and assist with a slight lift of the
shoulder. The patient will easily roll onto their side.
2. With the patient on their side, push the fabrics of the
seat and back gently under them
NOTE: The patient’s head should be positioned in the headrest
just below the top edge for maximum comfort and the lower
edge of the seat section positioned a few inches above the
back of the patient’s knees.
3. Roll the patient on to his/her back (figure 3).
NOTE: Assistants will reverse roles.
1. After the patient has been positioned on his/her back,
roll the patient to their right side (facing the assistant on
the left).
2. With an assistant on each side of the bed and up against
the mattress, the assistant on the right side of the bed
will elevate the left knee and position his/her right hand
under the patient’s left shoulder, slowly push on the knee
and assist with a slight lift of the shoulder and the patient
will easily roll onto their side.
3. Pull the fabrics of the seat and back across the mattress
until they are smooth.
4. Roll the patient onto their back and they should be
approximately centered on the sling.
5. Position the lift for use.
NOTE: The lift must be positioned for use before the slings can
be attached.
figure 1
figure 2
figure 3