


2000/2500 TheraPedic™ Vehicle Restraint System Instructions Rev: 10.06
Using the fine adjusters on the front, adjust the length of the harness for a comfortable fit. The harness must
fit snugly for proper protection. Adjust the tightness of the shoulder straps so that you can fit one or two
fingers (but no more) between the shoulder strap and the clavicle (collarbone). A snug strap should not allow
any slack, without sagging, while not pressing into the individual's body. Never lubricate the adjusters.
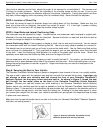
STEP 4: Location of Chest Clip
The chest clip serves to keep the shoulder straps from sliding down off the shoulders. Make sure that the
chest clip is even with an imaginary line drawn from armpit to armpit. If it is too high, it poses a choking
hazard, while if it is too low it will not keep the shoulder straps in place.
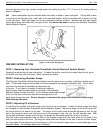
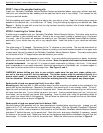
STEP 5: Head Pads and Lateral Positioning Pads
The head pads may be adjusted for height. Located behind, and underneath each head pad is a plastic ball,
attached to the lace that passes through the head pad. Squeeze the button on each ball and slide the ball up
or down to change the height of the head pads.
Lateral Positioning Pads: If the occupant is slender or small, the car seat may be too wide. You can narrow
the inside seat width with this Lateral Positioning Pad Set. Use only as many pads as needed for a correct fit.
First decide how far up the car seat you will want to narrow the inside width. Use the Positioning Pads as they
are or cut them to a customized fit. Then, peel back the edge of your car seat upholstery cover from the sides
of the shell. Insert the Positioning Pads between the inside of the plastic shell and the cover. Stretch the
upholstery cover back over the Positioning Pads, and over the edge of the shell.
You can experiment with the number of pads you insert to create the best fit. For comfort, you should leave
about one inch of space between either side of the occupant and the cover. As the individual grows, you may
change the pad arrangement to maintain a good fit. Larger individuals may not need the head pads or the
lateral pads at all.
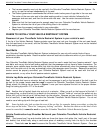
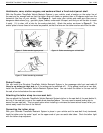
Step 6: Securing the Seat in Your Vehicle
The Columbia TheraPedic Vehicle Restraint System is designed to face forward in the car in an upright position.
The seat is held in place with the vehicle’s own seat belt and with the included tether strap. Important: do
not attempt to place your vehicle's seat belt around the front of your Columbia TheraPedic™
Restraint System, the way many infant seats are held in. As shown in Figure 2, thread the seat
belt through the two metal tubes on the back of the Columbia TheraPedic Vehicle Restraint
System. Connect your seat belt buckle and, while kneeling in the Columbia TheraPedic Vehicle Restraint
System, adjust your vehicle's seat belt as tight as possible to hold the Columbia TheraPedic Vehicle Restraint
System in place. If the seat belt is a combination lap and shoulder belt, pull upward on the shoulder portion of
the belt to tighten the lap portion, and then install the locking clip. Kneeling in the seat helps secure it; when
you remove your weight from the seat, your vehicle's upholstery will spring back into shape and keep the seat
in place even more securely.
Make sure that the seat belt buckle lies to one side or the other of a Columbia TheraPedic™ Restraint System’s
side tube, not resting across it.
4-7
:
Figure 2 Securing Columbia TheraPedic Vehicle
Restraint System with
vehicl
e's seat belt.