


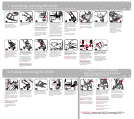

Release storage latch.
Tip: To avoid difficulty in
attaching rear wheels, keep
storage latch from resting above
rear-wheel axle housing.
Hold handle and lift upwards
until stroller frame is fully
extended and clicks into
position.
Push front swivel-wheel
assembly into front leg. Listen
for a positive “click” to ensure
the wheel is correctly fitted.
When properly fitted, the screw
head on the front swivel-wheel
assembly should face forward
and the wheel’s solid spoke
fronts should face outward.
Pull down gently on the wheel
to ensure it is fully engaged.
Repeat process for remaining
front wheel.
Push rear wheel into rear-
wheel axle housing. Wheel is
fitted when you hear a positive
“click.” Repeat process for
remaining rear wheel.
To ensure proper installation, use
arrow imprinted on outer wall
of tires as a visual guide. When
stroller is pushed forward, the
front of the arrows should point
and move in the same direction
in which the wheels are turning.
Check wheels are fully engaged
by gently trying to pull them
out.
Adjust handle height by
simultaneously pressing buttons
on inside of handle on both
sides and rotating padded
portion of handle into desired
position.
Check stroller frame is ready
for use by pressing down on
handle - stroller frame should
not collapse.
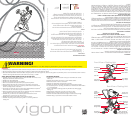
WARNING: Ensure stroller-
frame is locked before use.
vigour
vigour
Push down on parking brake
lever to lock brakes. To release
brake, lift parking brake lever.
IMPORTANT: Always engage
parking brake when fitting seat
unit.
To attach arm bar, align arm-
bar moldings with plastic tabs
on seating unit and slide both
arm-bar moldings onto seating
unit until fully engaged.
Ensure arm bar is securely in
place by gently pulling on it.
To remove arm bar, remove
hood (if fitted) and slide both
arm-bar moldings off plastic
tabs on stroller frame.
WARNING: NEVER lift stroller
by the arm bar or hood as they
may disengage. If needed, lift
stroller by handle and stroller
frame.
To fit hood, align moldings with
plastic tabs on arm bar and slide
down until fully engaged.
Hood can be fitted without arm
bar by aligning hood moldings
with plastic tabs on seat unit
and sliding down until fully
engaged.
To open hood, pull front of
hood forward then push hood
hinges down on both sides.
To close hood, lift up hood
hinges on both sides and push
front of hood back.
To adjust the angle of the
seating unit, squeeze recline
adjuster lever at top of seating
unit, then adjust seating unit to
desired position.
IMPORTANT: Use harness at all
times. Always support back of
stroller seat when reclining it.
To secure child in harness,
slide each waist clip (A) into
buckle (C) until prongs snap
into position. Clip harness belt
hooks (B) onto waist belt clip.
Carefully adjust harness by
pulling sliders (D) until desired
fit is achieved in waist, shoulder
and crotch straps.
WARNING: Always use crotch
strap in combination with
waist belt. Fasten harness
when not in use to prevent it
from becoming trapped when
folding the stroller.
To remove seating unit, apply
parking brake. Release both
locking clips from support bar
by lifting and holding both seat-
locking clips.
Raise rear of seating unit clear of
support bar, then slide seat unit
forward and out of the stroller
frame.
WARNING: Always remove child
from the seat before installation,
removal, change of seat
direction or folding.
Tip: Stroller frame may also
be folded with seating unit
attached.
Stand at rear of stroller frame,
pull both release latches and
twist right hand latch in the
direction of arrow marked on
release latch.
For more compact storage, fold
handle down. (See diagram 1e.)
Push handle down, allowing
stroller frame to fold until
it moves into a fully folded
position. Ensure storage latch is
closed.
For more compact storage,
remove front swivel wheels.
Slide front wheel locking button
toward the middle of the stroller,
then pull corresponding swivel
wheel out.
To remove rear wheels, press
rear wheel locking button
and pull corresponding rear
wheel out. Repeat process for
remaining rear wheel.
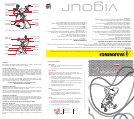
1. Assembling and using the stroller
(The stroller seat unit is intended for children six months or older and up to 40 lbs or 18 kg)
2. Folding and storing the stroller
3. Using as a travel system
Britax Companion
®
Click and Go
™
easy-assembly method
Lower the carrier rear facing with
attachment hooks aligned with
attachment bar. Press carrier onto
attachment bar until a positive
click is heard.
IMPORTANT: To ensure proper
installation, pull up on carrier by
the handle (in carrying position) to
verify both attachment hooks are
engaged with the attachment bar.
WARNING: Check that carrier
attachment bar is correctly
engaged before use.
WARNING: Ensure your child is
harnessed at all times.
WARNING: NEVER lift the stroller
by the infant carrier.
Remove seat unit. (See diagram
2a.) Swing carrier attachment bar
(hanging near front of the storage
basket) forward until it engages
with the stops affixed to the front
of the stroller frame.
IMPORTANT: When using as
a travel system, always remove
infant carrier prior to folding of
stroller.
WARNING: Apply parking brake
when attaching or removing your
infant carrier. (See diagram 1f.)
To remove carrier, squeeze
release lever on back of seat
while lifting carrier from stroller.
Pull carrier attachment bar away
from front stops and swing it
back so that it rests against the
front of the storage basket.
1h
To install seat unit (forward or
rear facing), store infant carrier
attachment bar. (See section 3.)
Slide hooks at foot end of seat
unit onto stroller support bar
until hooks are fully engaged
with support bar.
WARNING: Always remove
child from seat unit prior to
installation, removal or change
of seat direction.
To unlock swivel wheels, pull
front wheel swivel lock lever up
on each front wheel. To lock,
align wheels to rear of front leg
and push lock down.
1g
1b
1c
1d
1e
1f
Rotate seating unit downward
until seat locking clips fully
engage with the opposite bar.
WARNING: Check that
seating-unit attachment
devices are correctly engaged
before use.
1i
1j
1k
1l
1m
2a
2b
2c
2d
2e
3a
3b
3c
4b
1a
IMPORTANT: Seating unit MUST be removed PRIOR to
attaching a Britax child restraint. See diagram 2a.
1n
D
A
C
D
B
B
To raise shoulder harness height,
pull harness straps through harness
height adjuster so that they lay
flat on top of the harness height
adjusters.
To lower shoulder harness height,
thread harness straps through
harness height adjuster so they lay
flat against the seat back, under the
harness height adjuster.
1o