


A
B
C
1.
2.
1.
2.
A
B
A
B
C
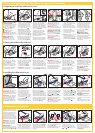
1 Preparing to install the child seat in a car
Handle – carrying, rocking
and stable position
To move the handle, push firmly
in towards the shell to release
lock and then move it to the
desired position (dia 1a):
A
– Carrying position
B
– Rocking position
C
– Stable position
IMPORTANT – Always check
the handle is upright and latched
properly before carrying.
Harness adjustment
IMPORTANT – You must
adjust the shoulder straps
of the harness to the correct
position for your child BEFORE
installing the child seat as it
cannot be adjusted in the car.
Carefully place the child seat
on the floor. Move the handle
to the stable position,
C
(dia 1a). With one hand lift
the fabric flap and press the
harness adjuster tab. With your
other hand pull the shoulder
straps forward as far as possible
to loosen the harness (dia 1b).
Unfasten the harness by pressing
the red harness buckle button.
Lay the shoulder straps over
the sides of the seat (dia 1c).
Place your child in the child seat
and check that the shoulder
strap slots are level with, or just
below, your child’s shoulders
and that the head is comfortably
positioned in the head support
when used (dia 1d).
To adjust the height of the
shoulder straps, first remove
your child from the seat.
Remove the shoulder pads (if
applicable) by sliding them off
the shoulder straps.
Next, pull one strap through
from the front and re-thread it
through the correct slot in the
harness adjustment is not
enough, i.e. shoulder straps
are at full extension.
b. Always return the crotch
strap to its original, shorter
length when using the seat
with a smaller baby.
c. The buckle should always
be positioned low down on
your child’s body.
d. DO NOT attempt to remove
the crotch strap from the
adjuster. Adjustment is made
by feeding the crotch strap
through the adjuster (dia 1f).
The adjuster at the end of the
crotch strap is found under the
front edge of the child seat.
To change the length of the
crotch strap, thread it through
the adjuster in the direction of
the arrows shown (dia 1f).
A
– Shortening
B
– Lengthening
Using the sun canopy
(Rock-a-Tot Plus Si only)
To fit the canopy place it over
the back of the child seat.
Then fasten the hooks on either
side of the sun canopy to the
cover elastics.
Children weighing up to 13kg (birth to approx 9-12 months)
shell, cover and head support
(dia 1e). Repeat with the
other strap making sure the
straps are not twisted.
IMPORTANT – The safety
harness provided with the child
seat must be used at all times.
Adjusting the crotch strap
IMPORTANT – You must adjust
the crotch strap to the correct
length for your child BEFORE
installing the child seat as it
cannot be adjusted in the car.
IMPORTANT –
a. The crotch strap should only
be extended when normal
1a 1d 1e
1f
1c1b
2 Fitting your child in the child seat
Everyday use of the harness
Move the handle to the
stable position, see “Handle
– carrying, rocking and stable
position” (dia 1a).
Place your child in the child
seat and fit the harness loosely
around them. Re-fasten the
harness buckle by fitting the
two tongues together and
pushing them firmly until you
hear a click (dia 2b). Make
sure the harness is not twisted.
Tighten the harness by pulling
the adjuster strap forward
making sure the harness is
a comfortable but FIRM fit
around your child (dia 2c).
IMPORTANT – The lap section
of the harness should rest as
forward and as low as possible
over your child’s pelvis. (if not
see ‘Adjusting the crotch strap’).
To remove your child from
the child seat first loosen the
harness by lifting the fabric flap
between your baby’s legs and
press the adjuster button down
as you pull the shoulder straps
forward (dia 2d). Then release
Using as a low chair
With the handle in the carrying
or rocking position, see
“Handle – carrying, rocking
and stable position”, the child
seat will rock gently as your
baby moves (dia 2e).
With the handle in the stable
position, the child seat
becomes a steady seat for
feeding or sleeping.
IMPORTANT – The safety
harness provided with the child
seat MUST be used at all times.
When using the child seat to feed
your baby, protect the harness
buckle with a cloth. A dirty
buckle may not close securely.
Carrying the seat with
your child in it
Always check the handle is
upright and latched properly
before carrying (dia 2f).
the harness by pressing the red
button on the buckle.
IMPORTANT – Your baby
should not stay in the child seat
or any infant carrier for periods
exceeding 2 hours at a time.
Laying the shoulder straps
over the side of the seat when
removing your child helps
prevent harness twisting.
2a 2d 2e
2f
2c2b
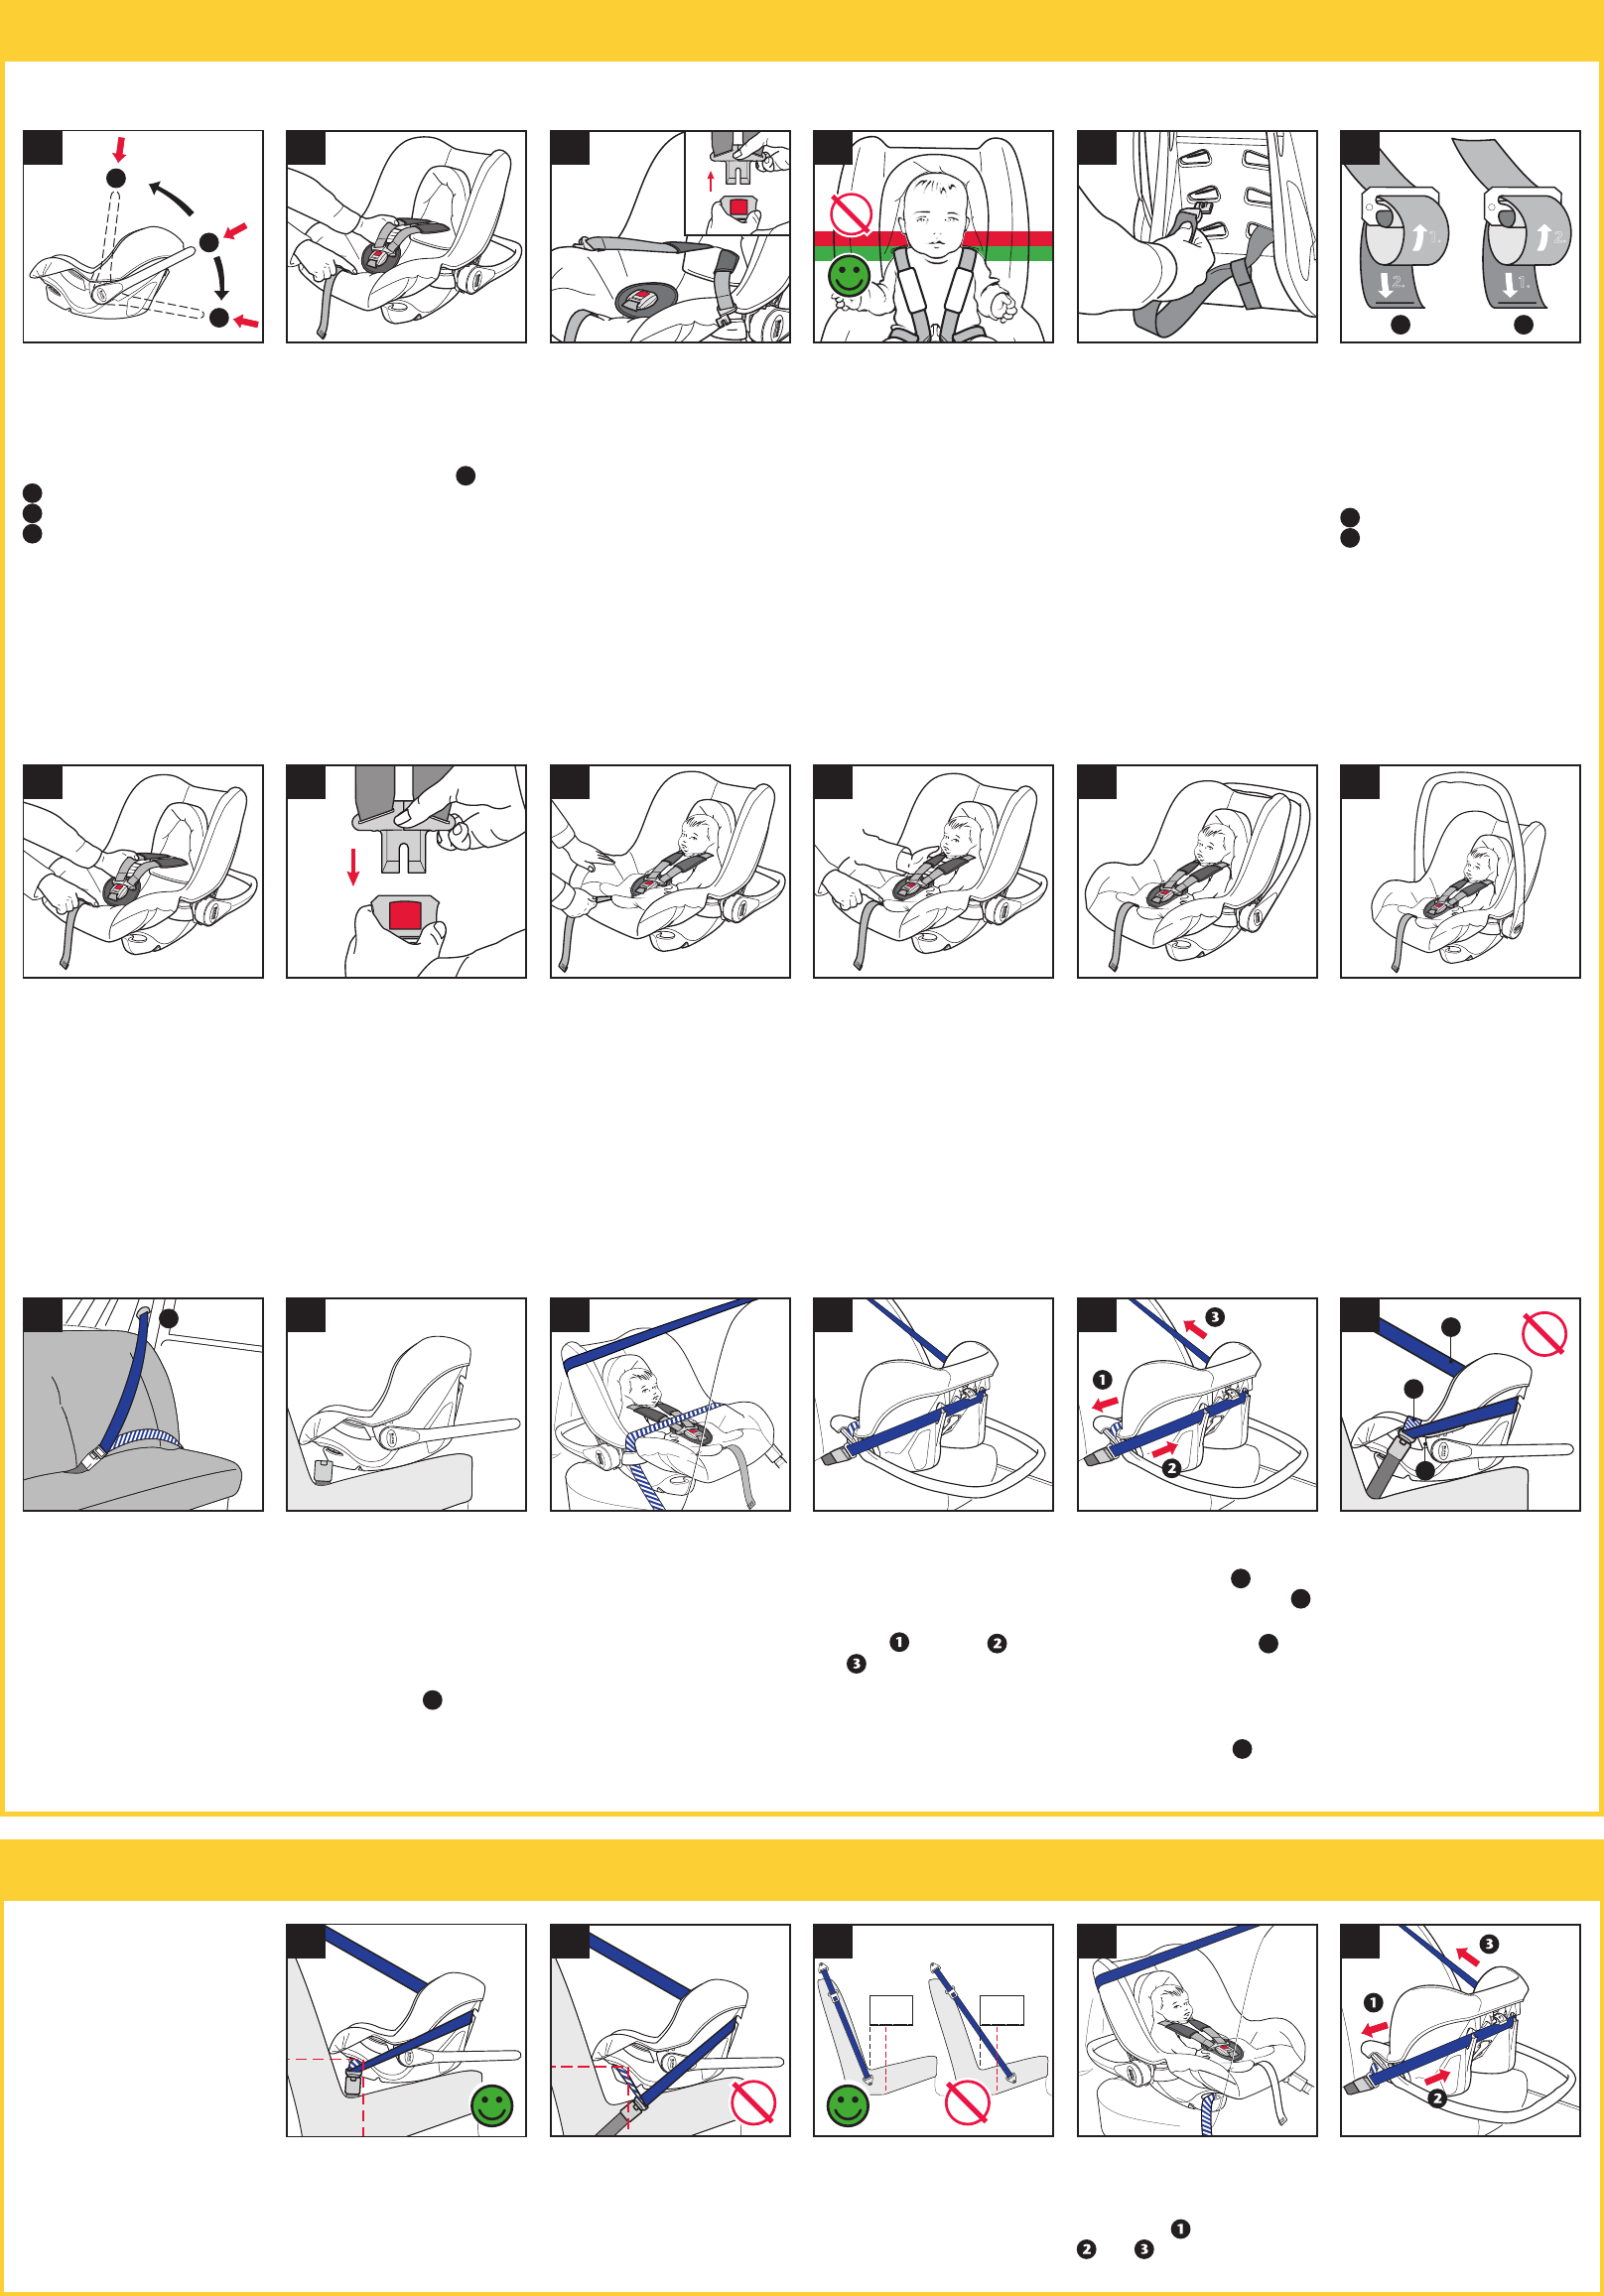
3 Installing the child seat in a car
IMPORTANT – Have you
adjusted the harness to the
correct position for your child?
IMPORTANT – The safety
harness provided with the child
seat must be used at all times.
IMPORTANT – The child seat
must only be fitted rearward-
facing, that is with your baby
facing the back of the car,
using a lap and diagonal seat
belt and NOT a lap-belt only.
Installing with a lap and
diagonal seat belt
To gain adequate length
from your seat belt it may
be necessary to slide the
vehicle seat as far back as it
will go (as you would for a tall
person), and lower the height
of the seat belt at
A
if this is
adjustable (dia 3a).
Place the child seat on a car
seat with your baby facing the
back of the car and move the
handle to the stable position
as shown, making sure it is
latched properly (dia 3b).
Fasten the seat belt across the
child seat. Pass the lap section
of the seat belt through the lap
guides on both sides as indicated
by the blue arrows on the child
seat. Pull the diagonal section of
the seat belt around the back of
the child seat (dia 3c).
ENSURE THAT:
a. The lap section of the
vehicle’s seat belt
A
runs
through both belt guides
B
on the child seat (dia 3f).
b. The diagonal section
C
runs
through the diagonal belt
guide on the back of the seat.
c. The car seat belt buckle is
not positioned in or in front
of the belt guides
B
.
IMPORTANT – FOR YOUR
CHILD’S SAFETY it is essential
that the diagonal part of the
seat belt goes round the back
of the seat.
Removing the child seat
from the car
First take the seat belt out of all
four guide slots, then undo the
seat belt.
Take care to keep the moving
seat belt away from your baby.
Feed the diagonal belt through
both diagonal belt guides
indicated by the blue arrows at
the back of the seat (dia 3d).
Tighten the seat belt by first
pulling at
and then
and to remove any slack
(dia 3e). Check that the child
seat feels secure and that the
seat belt is not twisted.
IMPORTANT – If your car seat
belt is not long enough, see
“Alternative installation”.
3a 3d 3e
3f
3c3b
A
A
B
C
Anchorage
Using the ruler guide printed on
the front of this user guide, check
that your lower anchorage is
within the white area as shown.
If it is in the red area then your
vehicle is not suitable for use with
the alternative routing (dia 4c).
The lap section of the seat belt
should pass through both belt
guides underneath the foot end
of the seat.
indicated by the blue arrows at
the back of the seat.
Tighten the seat belt by first
pulling here
and then here
and to remove any slack
(dia 4e). Check that the child
seat feels secure and that the
seat belt is not twisted.
If you are in any doubt please
contact Customer Services on
01264 386034.
4 Alternative installation
Pull the diagonal section of the
seat belt around the back of the
child seat (dia 4d).
Feed the diagonal belt through
both diagonal belt guides
Not all car seat belts meet the
latest European recommendations
and you may encounter some
installation problems. The most
common will be short seat
belts. The child seat has been
designed with this in mind and
an alternative routing for the lap
section of the seat belt is provided.
IMPORTANT – This method
is not suitable in all cars so you
MUST, before use, check the
buckle and anchorage details.
Buckle Position
The adult seat belt buckle must
be below and rearwards of the lap
guide as indicated (dia 4a & 4b).
4a 4d 4e4c4b