


clockwise direction.
To set the parking
brake, squeeze the
brake lever and
press and hold the
button down, then
release lever (Fig.
13 &14). When the
brake is properly set,
the button will
remain depressed
and the lever will
appear as shown in
Fig. 14. To release
the parking brake,
simply squeeze the
brake lever and the
button will pop up.
For the parking
brake to work
correctly, it is critical
that the brake be
adjusted properly.
Squeeze the brake
lever and verify that
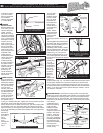
the brake pads contact the rim as shown in Fig. 16. If they are
misaligned, use a 10mm wrench to loosen brake pad nuts, slide pads
into correct position and tighten securely. The cable tension is pre-
adjusted at the factory yet the brake cable will need periodic adjustment
(as the cable stretches slightly and the black cable housing compresses
over time). To adjust cable tension, there are two barrel adjusters in
the brake assembly (Fig. 10 &13). To tighten the cable, loosen the
lock ring and turn the barrel adjuster in the counter clockwise direction.
Secure the barrel adjuster in the new position by tightening the lock
ring against the caliper or brake lever body. There should be a 3/16
clearance between the rim and brake pads as shown in Fig. 15. If
gap is not equal on each brake pad, you can reposition the brake on
the frame by loosening the 10 mm nut (Fig. 16) with a 10mm wrench,
adjust to the gap shown in Fig. 15 and re-tighten the same nut. If you
do not understand these instructions, or feel the brake is adjusted
incorrectly, take the stroller to your dealer for proper adjustment. If
your brake pads (Fig. 10) are worn, see your dealer for replacements.
SUN CANOPY: The stroller features a two position canopy. To fully
open the canopy, rotate the assembly forward until the fabric is taut.
The rear safari flap should be freed from the Velcro to give additional
sun protection. To reduce the size of the sun canopy, pull the canopy
toward the handlebar. The additional fabric can be gathered by pulling
the canopy (Fig. 1) drawstring and securing the cord lock.
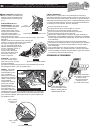
SEAT SAFETY
HARNESS: To secure your
child in the seat, put one
strap (grey) over each
shoulder and snap the male
buckle into the female
receiver on the crotch strap
(Fig. 17). Adjust shoulder
straps to be snug and
secure (Fig. 18). Connect
and adjust the sternum strap
(red), see Fig. 19.
WARNING: Never place
passengers in the stroller
without securing them in the
harness. Unrestrained
passengers can affect the
control of the stroller.
Passenger Weight Limit - 70 Pounds (32 Kilograms)
RECLINING SEAT: Set parking brake before making any seat
adjustments. To recline the seat, rotate the ladder locks (Fig. 20)
forward thus releasing the reclining straps. To raise the seat, pull the
reclining straps until you obtain
the desired position. The seat
back can be adjusted to recline
anywhere between the fully
upright position and the fully
reclined position (Fig. 20 & 21).
SHOCK ABSORBERS: The
suspension system features two
shock positions to provide a
comfortable ride for kids of
different weights. The two
positions are shown in Fig. 2.
Position 1 is intended for
occupants up to 40 lbs. ( 18 kg),
while position 2 is intended for
occupants from 40 to 70 lbs. (18
to 32 kg) total. The stroller
features a sliding track and spring
loaded shock axle that
automatically locks in place when
it aligns with either of the two
shock settings. Shock position
adjustments should be made with
the stroller unloaded. The shocks
will lock into position 1 when
unfolding the stroller. To use the
stiffer shock position, move the
shock from position 1 to position
2 by depressing the shock release
button (Fig. 2) with one hand, and
with the other hand, lift slightly
and pull the shock backward.
When the shock axle is properly
aligned in position 2, the axle will
snap into place. Repeat this
process for the second shock. To
move the shock from position 2
to position 1, reverse the above
process for both shocks.
FOLDING: Remove children
from stroller. Remove the contents
of the Low Boy cargo pouch. The
shock absorbers must be in
position 1 (Fig. 2) before folding.
Press both the right and left
handlebar release levers (Fig. 3),
and fold the handlebar forward
as shown in Fig. 22. Locate the
frame release handle underneath the seat (Fig. 23) and pull upwards
sharply. This will allow the lower frame to fold together, as shown in
Fig. 24. The folded stroller can be made even more compact by
removing the front and rear
wheels. The front wheel is
removed by opening the brake
quick release (Fig. 10), opening
the wheel quick release and
removing the wheel (see
section 6). Note that it is
often easier to open the
brake quick release
before you fold the
handlebar. The rear
wheels are removed by
opening the rear wheel
quick release (Fig. 4), and
removing the wheels.
The Wrist Strap can be used to
keep the stroller in the folded
position for transport and storage. With the stroller folded, loop the
end of the wrist strap around the handlebar and back to the rear axle
and fix the Velcro surfaces together (Fig. 25).
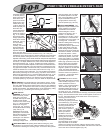
Sport Utility Stroller OWNERS MAN
U
9
12
10
11
Fig. 15 3/16 clearance between brake pad & rim
Tire
3/16
Rim
Brake
Body
Brake
Pad
Fig.16 Brake pads shown aligned to rim
10mm Nut
Fig. 17 Place straps over shoulders
and secure to buckle.
Shoulder
Strap
Fastener
Shoulder
Strap
Fig. 19 Connect Sternum Strap
Sternum
Strap
8
Fig. 22
Stroller with handle folded
Fig. 18 Securely adjust shoulder straps
Fig. 20
Seat Reclining
Ladder Locks
Reclining
Strap Loops
Fig. 21 Seat in fully reclined position.
Brake Pad
Nut