


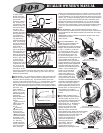
To adjust cable
tension, there are
two barrel adjusters
in the brake
assembly, shown in
Fig. 12 and Fig. 8.
To tighten the cable,
loosen the lock ring
and turn the barrel
adjuster in the
counter clockwise
direction. Secure the
barrel adjuster in the
new position by
tightening the lock
ring against the
caliper or brake lever
body. There should
be a 3/16 clearance
between the rim and
brake pads as
shown in Fig. 14. If
gap is not equal on
each brake pad, you
can reposition the
brake on the frame
by loosening the nut
shown in Fig. 8 with
a 10mm wrench,
adjust to the gap
shown in Fig. 14 and
re-tighten the 10mm
nut. If you do not
understand these
instructions, or feel
the brake is adjusted incorrectly, take the stroller to your dealer for
proper adjustment. If your brake pads (Fig. 8) are worn, see your
dealer for replacements.
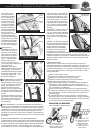
REAR WHEEL: Fig. 16 shows the anatomy of the rear wheel quick
release in its open position. Install the wheel by sliding the axle into
the hole in the rear dropout (Fig. 16) until the washer on the axle
comes in contact with the dropout (Fig. 17). If the axle does not slide
all the way into the snap ring, it is necessary to loosen the quick
release. Do this by placing the quick release in the fully open position,
Fig. 16, and loosening the adjust nut on the quick release. Re-install
the wheel. The
quick release is
NOT a nut and bolt
system. It is a cam-
activated tightening
mechanism.
Securely tighten the
quick release as
follows:
Move the quick
release lever fully
open position,
Fig.16.
Tighten the
adjusting nut by
turning it in the
clockwise direction.
Move the quick
release lever toward
the stroller, to the
closed position, Fig.
18. The word
CLOSE should be
clearly visible and
the quick release
lever should be
pointing up and parallel to the swing arm. When it is properly adjusted,
it will require considerable pressure to close the lever. If you do not
feel this resistance, turn the quick release lever back to the fully open
position, Fig. 16. Tighten the adjusting nut by hand (no tools required!)
one or two more turns in the clockwise direction. Move the quick
release lever toward the closed position, Fig. 18. When properly
adjusted, it requires 80-105 inch/pounds of pressure to move the
lever to the fully closed position. NOTE: Follow all instructions exactly.
If you are unsure how to operate the quick release, consult your
dealer.
TIRE PRESSURE: The recommended tire pressure range is
embossed on the sidewall of the tire, (usually 30-40 psi). Tire pressure
can be adjusted to offer different degrees of suspension and rolling
resistance.
IMPORTANT: Inflation pressure must always fall within the range
embossed on the side
wall of the tire.
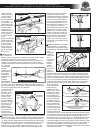
SHOCK ABSORBERS: The
suspension system features two
shock positions to provide a
comfortable ride for kids of different
weights. The two positions are shown
in Fig. 2. Position 1 is intended
for occupants up to 50 lbs. ( 22.5
kg), while position 2 is intended
for occupants from 50 to 100
lbs. (22.5 to 45 kg) total. The
Duallie features a sliding track and
spring loaded shock axle that
automatically locks in place when
it aligns with either of the two shock
settings. Shock position adjustments
should be made with the stroller
unloaded. The Duallie will lock into
position 1 when unfolding the
stroller. To use the stiffer
shock position, move the
shock from position 1 to
position 2 by depressing the
shock release button (Fig.
3) with one hand, and with
the other hand, lift slightly and
pull the shock backward. When the
shock axle is properly aligned in
position 2, the axle will snap into
place. Repeat this process for the
second shock. To move the shock
from position 2 to position 1,
reverse the above process for both
shocks.
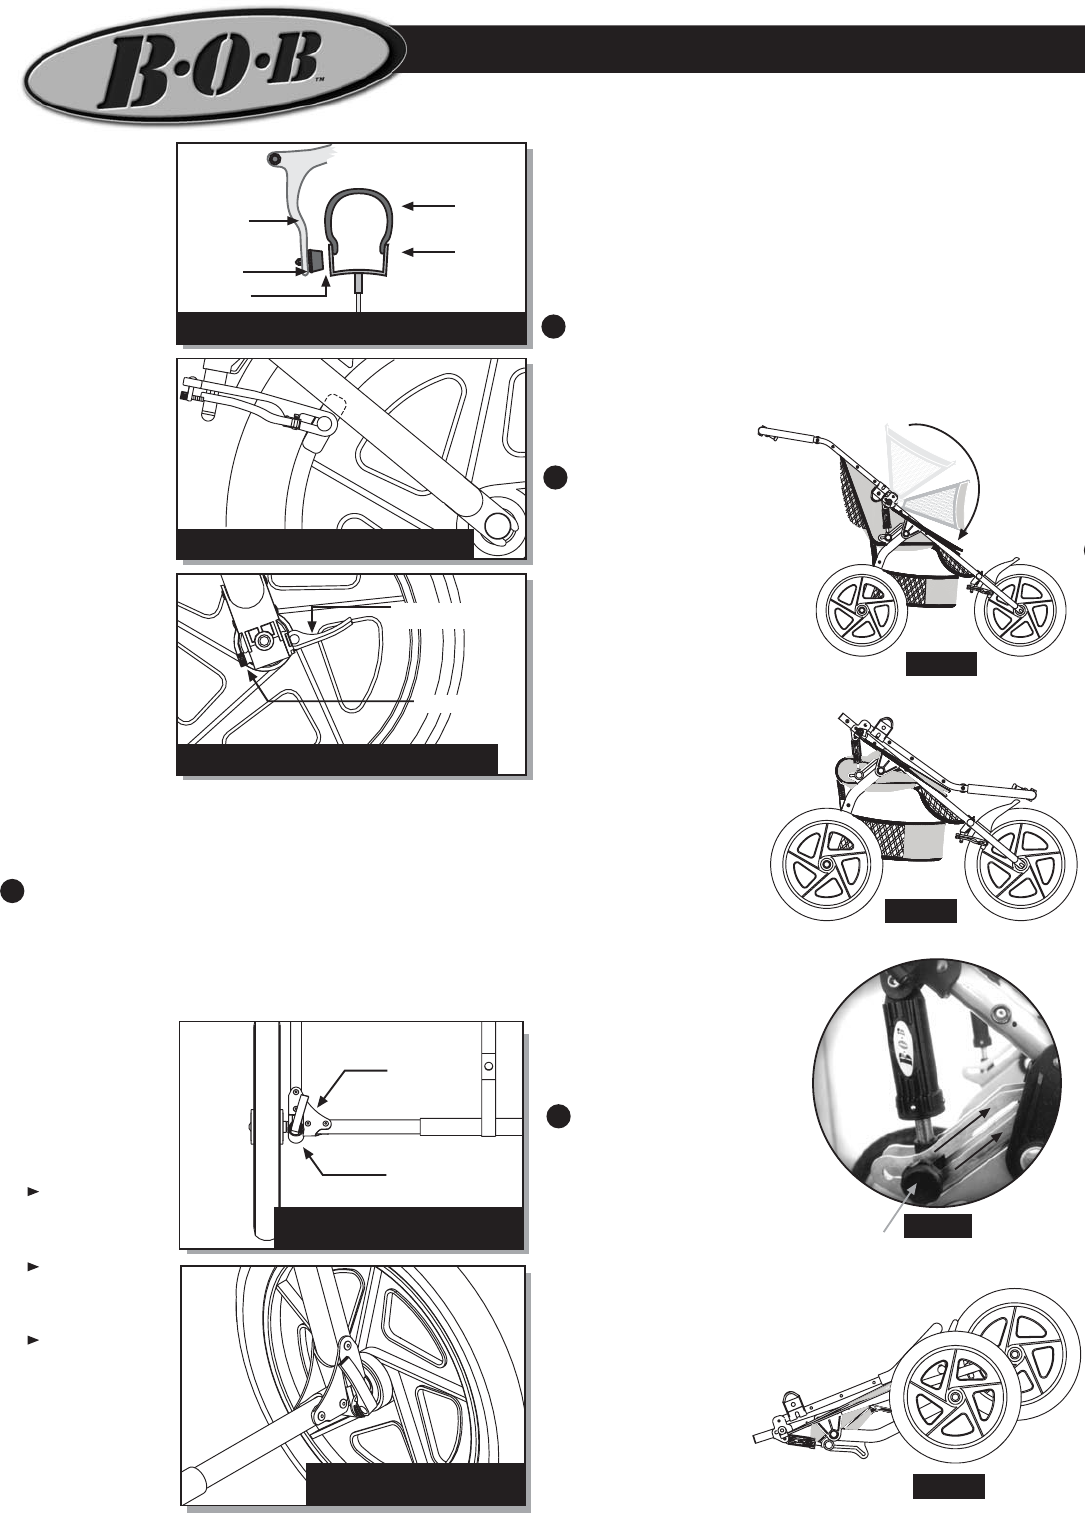
FOLDING: Collapse the sun
canopy, rotating it forward towards
the front wheel, as shown in Fig.
19. Remove the contents of the Low
Boy cargo pouch. Unbuckle the
AFOD strap (Fig. 4). Release the
clasps shown in Fig. 1, rotating
them up and fold the handle
forward as shown in Fig. 20.
With both hands, depress the
shock release knobs, lift the rear wheels slightly
and slide the shocks forward, Fig. 21. The
wheels will fold up and the stroller will
collapse as shown in Fig. 22. The
stroller can be folded to an
even more compact size by
removing the front and
rear wheels. The front
wheel is removed by
opening the brake quick
release (Fig. 8), opening the wheel
DUALLIE OWNERS MANUAL
9
12
Fig. 18 Quick release closed
and in the closed position.
Fig. 21
Depress shock release buttons,
lift rear wheels & slide shocks forward.
10
11
Fig. 17 Rear wheel installed with
snap ring contacting dropout.
Snap Ring
Dropout
Fig. 14 3/16 clearance between brake pad & rim
Tire
3/16
Rim
Brake
Body
Brake
Pad
Fig. 16 Anatomy or rear wheel quick release
Quick Release Lever
In Fully Open Position
Adjusting Nut
Fig. 15 Brake pads shown aligned to rim
Fig. 20
Stroller with canopy folded
Fig. 19
Sun canopy collapsed &
folded down on lower frame.
Fig. 22
Stroller in fully folded position