


Page 8
724-746-5500 | blackbox.com
Chapter 3: Assembly Instructions
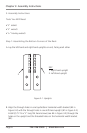
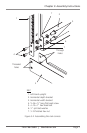
C. Align the through holes in one top/bottom horizontal depth bracket (#2 in
Figure 3-2) with the through holes on the opposite side of the upright in Step
1B (#1 in Figure 3-2). Install (2)
1
⁄2"-13 x 1" hex head bolts, lockwashers, and
(2)
1
⁄2-13 finished hex head nuts (see #5, #6, and #7 in Figure 3-2).
D. Align the through holes on the other side of the horizontal width bracket in
Step 1B (#3 in Figure 3-2) with the through holes in one right-hand upright (#1
in Figure 3-1).
E. Repeat steps A–D for the remaining left- and right-hand uprights (#1 and #2 in
Figure 3-1), horizontal width bracket (#3 in Figure 3-2), and horizontal depth
bracket (#2 in Figure 3-2).
Step 2: Assembling the Top Corners of the Rack
A. Stand the bottom corner assembly from Step 1 with the horizontal width and
depth brackets’ bottom edges flat on the floor.
B. Repeat Steps 1B through 1E for the remaining two top/bottom horizontal width
brackets and the two top/bottom horizontal depth brackets. See Figure 3-2.
Step 3: Final Tightening
Square the unit using a level or carpenter square. Tighten all bolts using a
3
⁄4"
socket and/or wrench.
Step 4: Secure the Rack to the Floor
CAUTION: Before installing equipment in the rack, bolt it to the floor, or to an
equally stable and secure surface before installing any equipment.