


22 23XD80USB Quick Start Guide
XD80USB
Getting started
(EN) Getting started
PLAYING
Play the kit and adjust the volume in your headphones
or external sound system to a safe listening level.
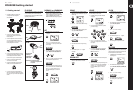
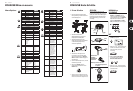
Each drum head or cymbal can give di erent sounds
depending on where it is hit:
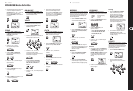
NORMAL or LEARNING
1. Press and hold PAGE/SELECT to enter the
NORMAL mode or LEARNING mode. (An LED
shows the mode.) Note: If you are practicing or
scoring in LEARNING mode, press PLAY/
PRACTICE or START/STOP to stop the play rst.
KIT
1. In NORMAL mode, press KIT until NUM
isdisplayed.
2. Press + or – to select from 10 preset kits,
or5user kits U11 to U15. Play each kit to hear
how it sounds.
3. Press KIT or PAGE/SELECT to display other kit
options: NUM, VOL, REV, EQH, EQM, EQL
4. Press + or – to adjust the range of each option.
Thesettings a ect all pads of the kit.
5. The settings will not be saved unless you save
them as a new user kit: Press SAVE/ENTER and
press + or – to choose from U11 to U15.
PressSAVE/ENTER again to save the new
userkit.
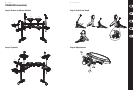
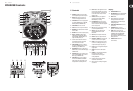
Crash and Ride
Kick
Hi-Hat
Snare and Toms
Head
Edge
Bow
Bow
Bow Shot with:
Pedal Open
Pedal Half Open
Pedal Closed
Pedal Only: Press down for “Chick”
Press down and quick-release
for “Splash”
Choke
Rim
Kick
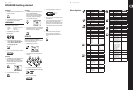
SONG KIT VOICE
PATTERN RHYTHM
LEARNING
PAGE/SELECT
NORMAL
BEAT
SONG
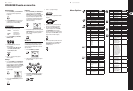
1. In NORMAL mode, press SONG until NUM is
displayed, then press START/STOP to play the
current song.
2. Press + or – to select from 60 di erent songs.
3. Press SONG or PAGE/SELECT to display other
song options: NUM, ACC, DRM
4. Press + or – to adjust the range of eachoption.
5. Press START/STOP to start or stop the song.
6. Press TEMPO and press + or – to adjust
thetempo.
DRUM OFF
1. In NORMAL mode, press DRUM OFF to mute/
unmute the drum track from the SONG.
VOICE
You can change the sound (voice) of each pad, and
save the settings as a new user kit.
1. In NORMAL mode, press VOICE until NUM
isdisplayed.
2. Press the pad button of the drum or cymbal
you want to change.
3. Press + or – to choose from 175 di erent
sounds. Press the pad to listen. The Hi-Hat has
four options.
4. Press VOICE or PAGE/SELECT to display other
voice options: NUM, VOL, PAN, PIT, REV,
MID, P--S, P--N, H--C
5. Press + or – to select the value of each option.
6. When you like the way the pads sound, you can
save this as a new user kit. Press SAVE/ENTER
and press + or – to choose from U11 to U15.
Press SAVE/ENTER again to save the new
userkit.
CLICK
1. In NORMAL mode, press CLICK to start the
metronome, and press again to stop.
2. Press PAGE/SELECT to display the metronome
options: SIG, INT, VOL, VOC
3. Press + or – to select the range.
4. Press TEMPO, then press + or – to adjust.
5. Press CLICK again to stop the metronome.
RECORD
You can record your playing, either on your own or
playing to a song. The drum track can be turned o .
Your playing and the song will be recorded, but not
the internal drum track or metronome.
1. In NORMAL mode, press RECORD to enter the
recording mode.
2. Press PAGE/SELECT to display recording
options: SNG, KIT, DPM, SIG, INT, DRM,PRC
3. Press + or – to select the range.
4. Press START/STOP or hit a drum to start
therecording. Press again to stop.
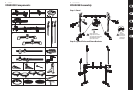
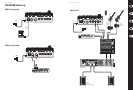
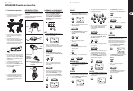
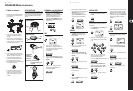
1. Assemble the drum kit as shown in the
assembly instructions and tighten
allconnections.
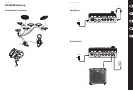
2. Connect the cables to the drum pads,
cymbalsand foot pedals, as shown in the
hook-up diagram.
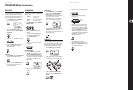
3. Connect headphones or make connections to
any external sound equipment such as an
external ampli er, or active speaker. See the
hook-up diagrams for some ideas.
4. Connect the power supply adapter to the local
mains supply. This universal adapter can accept
mains voltages from 100 VAC to 240 VAC.
Connect the DC output to the drummodule.
5. Do not turn on the drum module until all
connections have been made.
6. Turn down the VOLUME control on the drum
module, and turn on the POWER switch.
7. If you are using external sound equipment,
turn it on after the drum module. At the end of
the session, turn any external sound equipment
o rst.
Power
Adapter
Phones
Phones
DC IN