


– 4 –
6
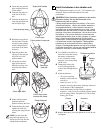
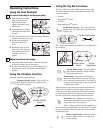
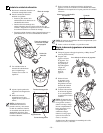
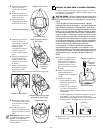
Install the vibration unit.
A Position the vibration unit with the
mounting groove on top.
B Install the vibration unit by doing
the following:
• Insert the rear of the unit into
the opening in the seat pad.
• Slide the mounting groove of
the vibration unit onto the U-shaped frame section. Be
careful not to pinch fabric or the power wiring in the
mounting groove.
• Push the vibration unit onto the frame until its front
panel is flush with the seat pad.
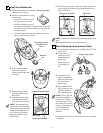
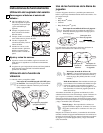
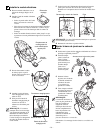
C Gently tilt the bouncer
frame over until the
backrest contacts the floor
or surface.
D Fasten the pair of hook-
and-loop patches on the
fabric flaps.
E Slide the hook-and-loop
strap through the fabric
loop and fasten it to itself.
NOTE: The opening in the
seat pad allows you to connect
or disconnect the power cable
without unfastening the seat
pad. This makes it easier to
change the batteries in the
vibration unit.
Mounting groove
Vibration
unit
Mounting location
in footrest wire
frame
Hook-and-loop patches
Fabric loop
Hook-and-loop strap
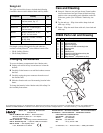
F Guide the toy bar power connector through the opening
in the seat pad. Plug it into the receptacle in the rear of
the vibration unit.
NOTE: The power connector is polarized (only plugs in one
way).
G Return the bouncer to the upright position.
7
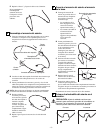
Mount the toy bar to the bouncer frame.
A Locate the plush sun/mirror toy and Baby Newton
™
(soft
plastic lion).
B Attach each toy
to the toy bar. Use
the opening in the
large ring to
attach each toy to
a ring under toy
bar.
C Orient the toy bar
with the caterpillar’s
head toward the right
side of the frame
(child’s left).
D Plug each end of the
toy bar into the corre-
sponding socket in
the connecting hub.
NOTE: The toy bar end
nearest the caterpillar
head has low-voltage
electrical contacts. Fully
insert the toy bar into the
sockets to provide power
to the caterpillar for
lights and melodies
functions.
Congratulations! The lights and melodies bouncer assembly
is complete.
Connector
Wiring
Opening in seat pad
Rings under toy bar