


Epson Perfection 2580 Photo
4 - Epson Perfection 2580 Photo 6/04
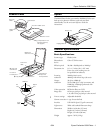
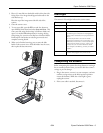
3. Flip out the metal film guide and press it down until it
clicks into place.
Caution: Before loading a film strip, make sure it contains at
least 2 photos, but no more than 6. Don’t load folded, creased,
curled, or sticky film into the auto film loader or it may damage
the film or your scanner.
4. Place the film strip in the film loader with the shiny base
side facing down. Your images and any wording on the film
strip should appear backward on the side that faces up.
5. Slowly slide the film into the loader. Let go of the film when
the scanner begins to automatically feed it into position.
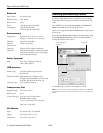
6. To scan each frame in your film strip as a separate image,
press the 4 Scan and Save button or open EPSON Smart
Panel and select
Scan and Save. This scans each frame
using ideal settings in Full Auto Mode and opens each one
separately in ArcSoft PhotoImpression for viewing, editing,
and printing. See your on-screen Reference Guide and Smart
Panel help for instructions on selecting scan modes and
complete scanning details.
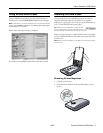
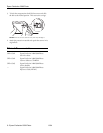
7. When you finish scanning the film strip, press the
Eject
button inside the auto film loader to eject the film. Wait for
the ] Start light to stay on green, then remove the film
strip.
Caution: Don’t turn off the scanner with a film strip loaded in the
auto film loader. Never pull film out of the loader by force.
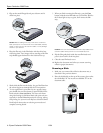
8. Flip the film guide back inside the auto film loader and
press it down until it clicks into place.
9. Close the auto film loader cover.
10. Replace the document mat before you resume scanning
reflective (paper) documents.
Scanning a Slide
1. Make sure you removed the reflective document mat, as
described in the previous column.
2. Place the slide holder on the top of the scanner glass so that
the tab labelled “D” fits into the area labelled “D” on the
document table.