


SETUP GUIDE - yDTX502 SERIES HYBRID PACKS
!
3b.!Select the Pad Type(s) for the drum pad(s) in your Hybrid Pack.!
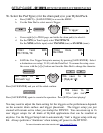
! ! a.! Press [SHIFT] + [SAVE/ENTER] to access the MENU.!
! ! b.! Use the Data Dial to select menu 6:Trigger.!
!
!
!
!
! ! c.! Cursor right [>] to TRG3 page, and strike the drum pad(s) to select it.!
! ! d.! For the TP70 (in Tom3 input) select TM:TP70S/70.!
! ! ! For the XP80 (in Ride input) select TM:XP80 (tom) or SN:XP80 (snare).!
!
!!!
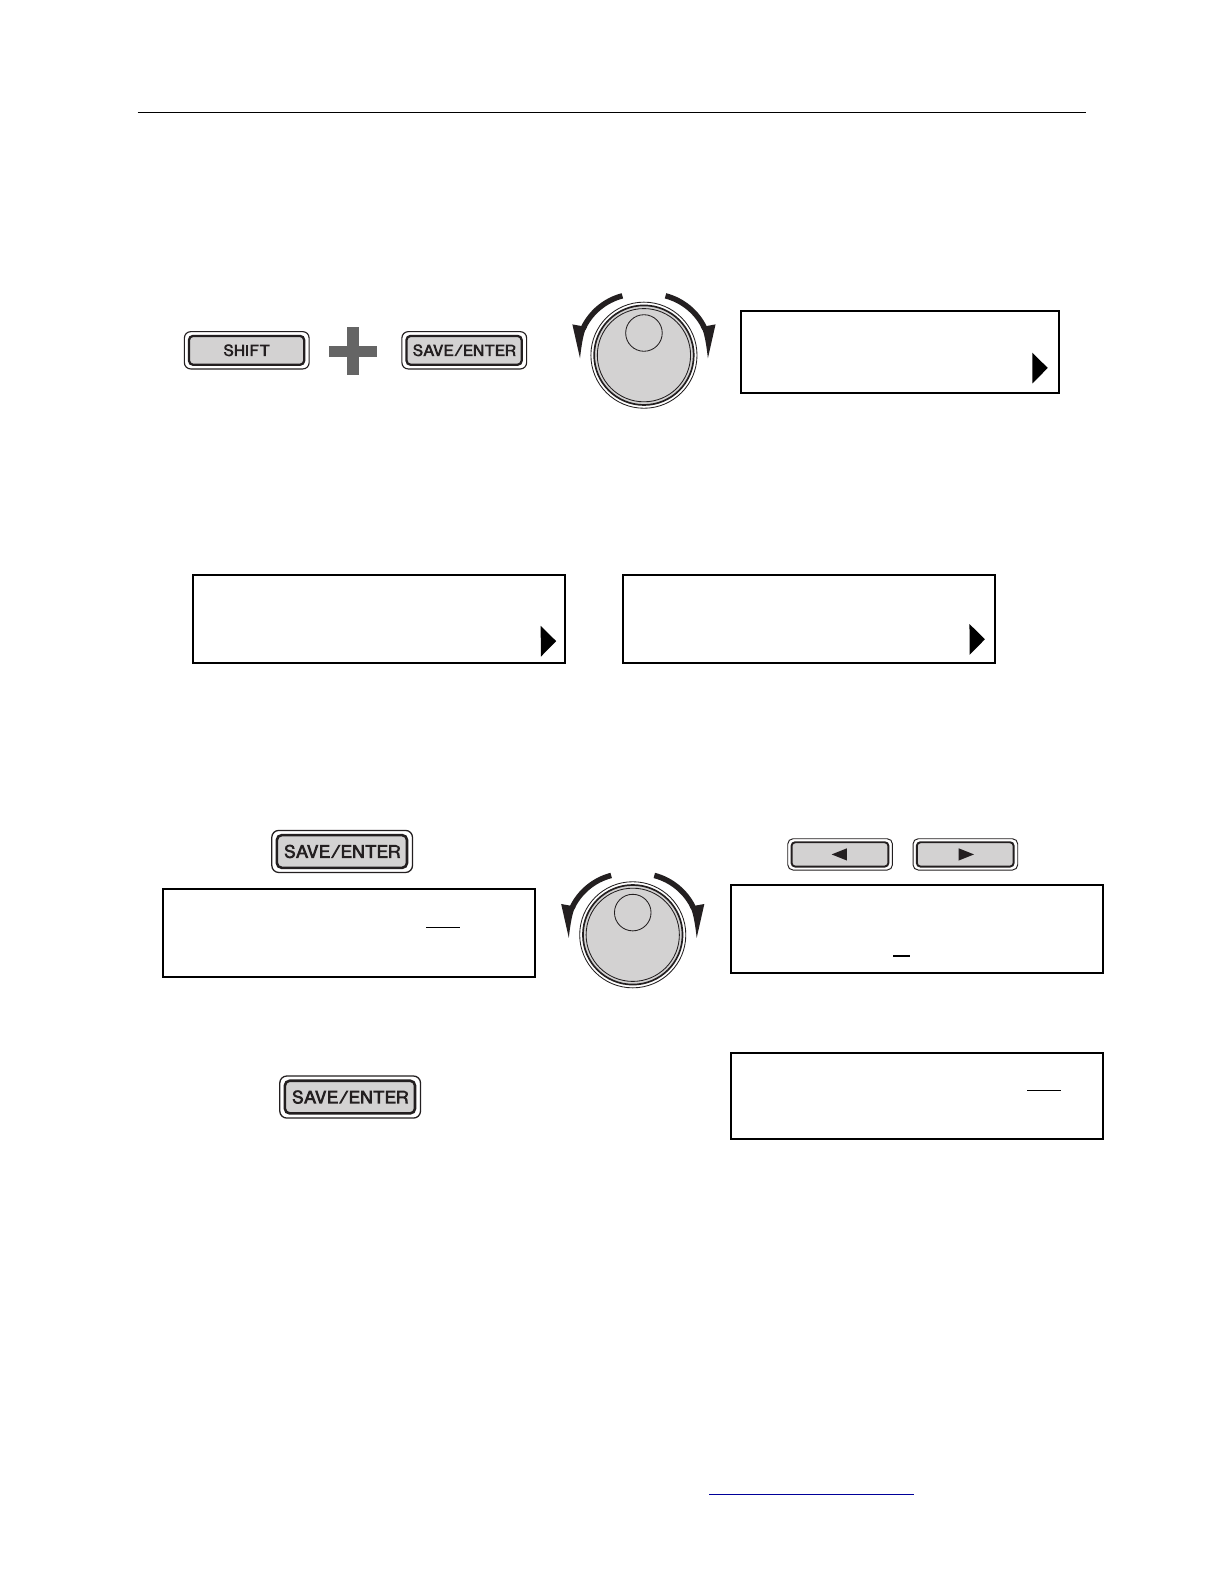
! ! e.! SAVE the User Trigger Setup into memory by pressing [SAVE/ENTER]. Select !
! ! ! a destination user setup (15-30) with the Data Dial. To rename the setup, move !
! ! ! the cursor with the [<][>] buttons and turn the Data Dial to change the character. !
!!!!
!
!
Press [SAVE/ENTER] and you will be asked confirm.!
Press [SAVE/ENTER] again to execute the operation. Press [KIT] and start playing!!
!
You may need to adjust the Gain setting for the triggers as the performance depends
on the acoustic drum surface and trigger placement. The trigger setup you just
created will remain active when you startup the DTX502. You can create up to 16
user trigger setups for all kinds of Hybrid applications that can be recalled at
anytime. Use the Trigger Setup Link to automatically ‘link’ a trigger setup with any
Kit. Always perform a “shutdown’ when turning off power to the DTX502.
For more information and video tutorials visit www.YamahaDTX.com
Advanced Techniques
Setting Parameters using Menu Mode
56
DTX502 Owner’s Manual
Use the following procedure in Menu Mode to select parameters
and change their settings.
1. Hold down the [SHIFT] button and press the [SAVE/
ENTER] button to access Menu Mode.
2. Turn the Data Dial to select the area containing the parame-
ter you wish to set.
3. Use the [<]/[>] buttons to select the parameter.
4. Turn the Data Dial to change the parameter’s setting.
Parameter values from pages where an asterisk is not dis-
played are stored automatically.
Setting Procedure
NOTE
When a number of parameters are contained in a single page,
you can move the cursor between them using the [<]/[>] but-
tons.
Whenever you change a parameter setting in the Kit-
Voice area, the KitCommon area, the KitJob area, or on
one of pages TRG2 to TRG12 from the Trigger area, an
asterisk will be displayed after the page name (i.e.,
“TRG2*”). This is to remind you that parameters have
been changed but not yet stored. To store your settings,
follow the procedure described in the column on the
right. The asterisk will disappear when you store your
settings.
MENU
01:Mixer ‚
Hold
MENU
02:Ki
t
Voice ‚
>Ki
t
V1 snareHd
”Layer=s
t
ack ‚
>Ki
t
V1* snareHd
”Layer=XFade1 ‚
NOTICE
Storing your settings
If you change a parameter setting in the KitVoice area, the Kit-
Common area, the KitJob area, or on one of pages TRG2 to
TRG12 from the Trigger area, you will need to store the new
setting in the drum module’s internal memory as described
below.
Procedure
As an example, the following describes how to store modified
trigger settings. Note that trigger settings are stored as part of
a User trigger setup. Meanwhile, settings from the KitVoice,
KitCommon, and KitJob areas are stored as part of one of the
User kits, which are numbered 51 to 100 (page 25).
1. After changing trigger parameter settings, press the
[SAVE/ENTER] button.
The page for storing trigger setup data will be displayed.
2. Turn the Data Dial to select the User trigger setup (15 to
30) in which you wish to store your settings.
3. To rename the trigger setup, move the cursor using the
[<]/[>] buttons and turn the Data Dial to change the
selected character.
4. Press the [SAVE/ENTER] button once again.
Yo u will be asked to confirm that you wish to store your
settings.
5. Press the [SAVE/ENTER] button to store your settings.
To cancel the process without storing any settings, press
the [ ] button.
6. When your settings have been successfully stored, the
message “Completed.” will be displayed.
NOTE
If you switch to another kit or trigger setup or turn off the drum
module without storing your new settings, the parameters in
question will revert to their previously stored settings.
tRG sa
V
e
t
o 15
:[DtX522K ]
tRG sa
V
e
t
o 16
:[DtX522K ]
tRG sa
V
e
t
o 16
Are you sure?
CAUTION
When you store trigger setup data, all of the data in
the selected trigger setup will be overwritten with
your new settings. Before proceeding, therefore,
you should ensure that the trigger setup in question
contains no irreplaceable settings.
Advanced Techniques
Setting Parameters using Menu Mode
56
DTX502 Owner’s Manual
Use the following procedure in Menu Mode to select parameters
and change their settings.
1. Hold down the [SHIFT] button and press the [SAVE/
ENTER] button to access Menu Mode.
2. Turn the Data Dial to select the area containing the parame-
ter you wish to set.
3. Use the [<]/[>] buttons to select the parameter.
4. Turn the Data Dial to change the parameter’s setting.
Parameter values from pages where an asterisk is not dis-
played are stored automatically.
Setting Procedure
NOTE
When a number of parameters are contained in a single page,
you can move the cu rsor between them using the [<]/[>] but-
tons.
Whenever you change a parameter setting in the Kit-
Voice area, the KitCommon area, the KitJob area, or on
one of pages TRG2 to TRG12 from the Trigger area, an
asterisk will be displayed after the page name (i.e.,
“TRG2*”). This is to remind you that parameters have
been changed but not yet stored. To store your settings,
follow the procedure described in the column on the
right. The asterisk will disappear when you store your
settings.
MENU
01:Mixer ‚
Hold
MENU
02:Ki
t
Voice ‚
>Ki
t
V1 snareHd
”Layer=s
t
ack ‚
>Ki
t
V1* snareHd
”Layer=XFade1 ‚
NOTICE
Storing your settings
If you change a parameter setting in the KitVoice area, the Kit-
Common area, the KitJob area, or on one of pages TRG2 to
TRG12 from the Trigger area, you will need to store the new
setting in the drum module’s internal memory as described
below.
Procedure
As an example, the following describes how to store modified
trigger settings. Note that trigger settings are stored as part of
a User trigger setup. Meanwhile, settings from the KitVoice,
KitCommon, and KitJob areas are stored as part of one of the
User kits, which are numbered 51 to 100 (page 25).
1. After changing trigger parameter settings, press the
[SAVE/ENTER] button.
The page for storing trigger setup data will be displayed.
2. Turn the Data Dial to select the User trigger setup (15 to
30) in which you wish to store your settings.
3. To r en am e the trigg er s etup, move the cursor u sing the
[<]/[>] buttons and turn the Data Dial to change the
selected character.
4. Press the [SAVE/ENTER] button once again.
Yo u will be asked to confirm that you wish to store your
settings.
5. Press the [SAVE/ENTER] button to store your settings.
To ca nc el the p ro ce ss without storing any settings, press
the [ ] button.
6. When your settings have been successfully stored, the
message “Completed.” will be displayed.
NOTE
If you switch to another kit or trigger setup or turn off the drum
module without storing your new settings, the parameters in
question will revert to their previously stored settings.
tRG sa
V
e
t
o 15
:[DtX522K ]
tRG sa
V
e
t
o 16
:[DtX522K ]
tRG sa
V
e
t
o 16
Are you sure?
CAUTION
When you store trigger setup data, all of the data in
the selected trigger setup will be overwritten with
your new settings. Before proceeding, therefore,
you should ensure that the trigger setup in question
contains no irreplaceable settings.
MENU
06: Trigger
>TRG3 Ride 00%
SN:XP80
>TRG3 Tom3 00%
TM:TP70S/70
Advanced Techniques
Setting Parameters using Menu Mode
56
DTX502 Owner’s Manual
Use the following procedure in Menu Mode to select parameters
and change their settings.
1. Hold down the [SHIFT] button and press the [SAVE/
ENTER] button to access Menu Mode.
2. Turn the Data Dial to select the area containing the parame-
ter you wish to set.
3. Use the [<]/[>] buttons to select the parameter.
4. Turn the Data Dial to change the parameter’s setting.
Parameter values from pages where an asterisk is not dis-
played are stored automatically.
Setting Procedure
NOTE
When a number of parameters are contained in a single page,
you can move the cu rsor between them using the [<]/[>] but-
tons.
Whenever you change a parameter setting in the Kit-
Voice area, the KitCommon area, the KitJob area, or on
one of pages TRG2 to TRG12 from the Trigger area, an
asterisk will be displayed after the page name (i.e.,
“TRG2*”). This is to remind you that parameters have
been changed but not yet stored. To store your settings,
follow the procedure described in the column on the
right. The asterisk will disappear when you store your
settings.
MENU
01:Mixer ‚
Hold
MENU
02:Ki
t
Voice ‚
>Ki
t
V1 snareHd
”Layer=s
t
ack ‚
>Ki
t
V1* snareHd
”Layer=XFade1 ‚
NOTICE
Storing your settings
If you change a parameter setting in the KitVoice area, the Kit-
Common area, the KitJob area, or on one of pages TRG2 to
TRG12 from the Trigger area, you will need to store the new
setting in the drum module’s internal memory as described
below.
Procedure
As an example, the following describes how to store modified
trigger settings. Note that trigger settings are stored as part of
a User trigger setup. Meanwhile, settings from the KitVoice,
KitCommon, and KitJob areas are stored as part of one of the
User kits, which are numbered 51 to 100 (page 25).
1. After changing trigger parameter settings, press the
[SAVE/ENTER] button.
The page for storing trigger setup data will be displayed.
2. Turn the Data Dial to select the User trigger setup (15 to
30) in which you wish to store your settings.
3. To ren ame th e trigg er setup, move the cursor using the
[<]/[>] buttons and turn the Data Dial to change the
selected character.
4. Press the [SAVE/ENTER] button once again.
Yo u will be asked to confirm that you wish to store your
settings.
5. Press the [SAVE/ENTER] button to store your settings.
To can ce l t he pro ce ss without storing any settings, press
the [ ] button.
6. When your settings have been successfully stored, the
message “Completed.” will be displayed.
NOTE
If you switch to another kit or trigger setup or turn off the drum
module without storing your new settings, the parameters in
question will revert to their previously stored settings.
tRG sa
V
e
t
o 15
:[DtX522K ]
tRG sa
V
e
t
o 16
:[DtX522K ]
tRG sa
V
e
t
o 16
Are you sure?
CAUTION
When you store trigger setup data, all of the data in
the selected trigger setup will be overwritten with
your new settings. Before proceeding, therefore,
you should ensure that the trigger setup in question
contains no irreplaceable settings.
TRG save to 15
:[DrumTrig]
TRG save to 16
:[MyHybrid]
Advanced Techniques
Setting Parameters using Menu Mode
56
DTX502 Owner’s Manual
Use the following procedure in Menu Mode to select parameters
and change their settings.
1. Hold down the [SHIFT] button and press the [SAVE/
ENTER] button to access Menu Mode.
2. Turn the Data Dial to select the area containing the parame-
ter you wish to set.
3. Use the [<]/[>] buttons to select the parameter.
4. Turn the Data Dial to change the parameter’s setting.
Parameter values from pages where an asterisk is not dis-
played are stored automatically.
Setting Procedure
NOTE
When a number of parameters are contained in a single page,
you can move the cu rsor between them using the [<]/[>] but-
tons.
Whenever you change a parameter setting in the Kit-
Voice area, the KitCommon area, the KitJob area, or on
one of pages TRG2 to TRG12 from the Trigger area, an
asterisk will be displayed after the page name (i.e.,
“TRG2*”). This is to remind you that parameters have
been changed but not yet stored. To store your settings,
follow the procedure described in the column on the
right. The asterisk will disappear when you store your
settings.
MENU
01:Mixer ‚
Hold
MENU
02:Ki
t
Voice ‚
>Ki
t
V1 snareHd
”Layer=s
t
ack ‚
>Ki
t
V1* snareHd
”Layer=XFade1 ‚
NOTICE
Storing your settings
If you change a parameter setting in the KitVoice area, the Kit-
Common area, the KitJob area, or on one of pages TRG2 to
TRG12 from the Trigger area, you will need to store the new
setting in the drum module’s internal memory as described
below.
Procedure
As an example, the following describes how to store modified
trigger settings. Note that trigger settings are stored as part of
a User trigger setup. Meanwhile, settings from the KitVoice,
KitCommon, and KitJob areas are stored as part of one of the
User kits, which are numbered 51 to 100 (page 25).
1. After changing trigger parameter settings, press the
[SAVE/ENTER] button.
The page for storing trigger setup data will be displayed.
2. Turn the Data Dial to select the User trigger setup (15 to
30) in which you wish to store your settings.
3. To r en am e the trigg er s etup, move the cursor u sing the
[<]/[>] buttons and turn the Data Dial to change the
selected character.
4. Press the [SAVE/ENTER] button once again.
Yo u will be asked to confirm that you wish to store your
settings.
5. Press the [SAVE/ENTER] button to store your settings.
To ca nc el the p ro ce ss without storing any settings, press
the [ ] button.
6. When your settings have been successfully stored, the
message “Completed.” will be displayed.
NOTE
If you switch to another kit or trigger setup or turn off the drum
module without storing your new settings, the parameters in
question will revert to their previously stored settings.
tRG sa
V
e
t
o 15
:[DtX522K ]
tRG sa
V
e
t
o 16
:[DtX522K ]
tRG sa
V
e
t
o 16
Are you sure?
CAUTION
When you store trigger setup data, all of the data in
the selected trigger setup will be overwritten with
your new settings. Before proceeding, therefore,
you should ensure that the trigger setup in question
contains no irreplaceable settings.
TRG save to 16
Are you sure?
Basic Techniques
DTX502 Owner’s Manual
Building Your Own Unique Kits
21
1.
Navigate to the KIT2 page using the [<]/[>] buttons.
2.
Strike the pad whose instrument voice you wish to
change.
3.
If necessary, move the cursor to the voice category
using the [<]/[>] buttons.
4.
If necessary, turn the Data Dial to select a different
voice category.
Vo i c es a re or g a n i zed i nto t he f ol lo w i n g cat e go r ies o n the D TX5 02.
5.
Move the cursor to the voice number using the [<]/[>]
buttons.
6.
Turn the Data Dial to select a different voice.
KIT2
Assigning Voices to Instruments
K Kick H Hi-hat
S Snare P Percussion
T Tom E Effect
C Cymbal W Wave Voice
KIt2 Snare
”S01:MapleCus
t
m‚
NOTE
As an alternative to selecting a pad by
striking it, you can change the current
selection by pressing the [<]/[>] but-
tons with the [SHIFT] button held
down.
KIt2 Snare
”S01:MapleCus
t
m‚
NOTE
The term “Wave Voice” refers to an
audio file transferred from a computer
to your DTX502 via USB (page 79).
KIt2* Snare
”S01:MapleCus
t
m‚
NOTE
•When voice number 0 (“No Assign”)
is selected for an instrument, it will
not produce any sound when struck.
•To assign a voice to a specific zone,
strike the zone while holding down
the [SHIFT] button. For details, see
Tip: Input Sources on page 29.
•Two different voices can be simulta-
neously assigned to each pad or
zone. For details, see the descrip-
tion of the Layers page from Menu
Mode (page 57).
Advanced Techniques
Setting Parameters using Menu Mode
56
DTX502 Owner’s Manual
Use the following procedure in Menu Mode to select parameters
and change their settings.
1. Hold down the [SHIFT] button and press the [SAVE/
ENTER] button to access Menu Mode.
2. Turn the Data Dial to select the area containing the parame-
ter you wish to set.
3. Use the [<]/[>] buttons to select the parameter.
4. Turn the Data Dial to change the parameter’s setting.
Parameter values from pages where an asterisk is not dis-
played are stored automatically.
Setting Procedure
NOTE
When a number of parameters are contained in a single page,
you can move the cu rsor between them using the [<]/[>] but-
tons.
Whenever you change a parameter setting in the Kit-
Voice area, the KitCommon area, the KitJob area, or on
one of pages TRG2 to TRG12 from the Trigger area, an
asterisk will be displayed after the page name (i.e.,
“TRG2*”). This is to remind you that parameters have
been changed but not yet stored. To store your settings,
follow the procedure described in the column on the
right. The asterisk will disappear when you store your
settings.
MENU
01:Mixer ‚
Hold
MENU
02:Ki
t
Voice ‚
>Ki
t
V1 snareHd
”Layer=s
t
ack ‚
>Ki
t
V1* snareHd
”Layer=XFade1 ‚
NOTICE
Storing your settings
If you change a parameter setting in the KitVoice area, the Kit-
Common area, the KitJob area, or on one of pages TRG2 to
TRG12 from the Trigger area, you will need to store the new
setting in the drum module’s internal memory as described
below.
Procedure
As an example, the following describes how to store modified
trigger settings. Note that trigger settings are stored as part of
a User trigger setup. Meanwhile, settings from the KitVoice,
KitCommon, and KitJob areas are stored as part of one of the
User kits, which are numbered 51 to 100 (page 25).
1. After changing trigger parameter settings, press the
[SAVE/ENTER] button.
The page for storing trigger setup data will be displayed.
2. Turn the Data Dial to select the User trigger setup (15 to
30) in which you wish to store your settings.
3. To ren ame th e trigg er setup, move the cursor using the
[<]/[>] buttons and turn the Data Dial to change the
selected character.
4. Press the [SAVE/ENTER] button once again.
Yo u will be asked to confirm that you wish to store your
settings.
5. Press the [SAVE/ENTER] button to store your settings.
To can ce l t he pro ce ss without storing any settings, press
the [ ] button.
6. When your settings have been successfully stored, the
message “Completed.” will be displayed.
NOTE
If you switch to another kit or trigger setup or turn off the drum
module without storing your new settings, the parameters in
question will revert to their previously stored settings.
tRG sa
V
e
t
o 15
:[DtX522K ]
tRG sa
V
e
t
o 16
:[DtX522K ]
tRG sa
V
e
t
o 16
Are you sure?
CAUTION
When you store trigger setup data, all of the data in
the selected trigger setup will be overwritten with
your new settings. Before proceeding, therefore,
you should ensure that the trigger setup in question
contains no irreplaceable settings.