


rod with the basket into its housing, and press
until it clicks into place.
11• Attach the basket in the front by slipping the
buttonholes over the hooks under the footboard.
To fasten the side of the basket, lower the basket
rod and slip the buttonholes over the hooks, as
shown in the figure.
POUCH
12• The pouch that comes with the stroller attaches
to the handle. Place the pouch as shown in the
figure and press it downwards, all the way into the
housing on the handle. (Repeat on the other side).
13• The pouch can be worn as an accessory, using the
special belt.
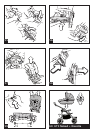
HOOD
14• To attach the hood, insert the fasteners into the
special housings, as shown in the figure.
15• Button the hood to the back of the backrest and
the inside of the armrests, as shown in the figure.
16• Lower the braces to stretch the hood.
17• The hood reclines along with the backrest. When
you lift the moveable part of the hood, you will
find a net insert that will provide better ventilation
for the baby, while allowing you to see him from
any position.
18• The hood can easily be turned into a sun canopy,
as shown in the figure.
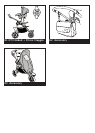
19• To remove the hood, fold the braces, unbutton
the hood, and press the button as shown in the
figure while slipping the hood fastener out of its
housing. (Repeat on the other side).
COVER
20• Fasten the cover by zipping it to the footboard, as
shown in the figure.
RAIN CANOPY
21• To mount the rain canopy, fasten the zipper on
the canopy to the zipper on the hood, and button
the sides to the hood.
22• Slip the rain canopy elastic over the bottom of the
front frame and button it as shown in the figure.
23• The practical rain canopy can be lowered by
opening the zipper and leaving the canopy
buttoned to the stroller.
24• This rain canopy has also been designed for use
with the Primo Viaggio child car seat attached to
the stroller, to guarantee total protection for your
child.
• Do not use the rain canopy in closed areas. Always
check to make sure that the child is not too hot.
• Do not place the PVC rain canopy near heat
sources. Be careful with cigarettes when near the
rain canopy.
• Make sure that the rain canopy does not become
entangled in any moving mechanism on the
stroller or chassis.
• Always remove the rain canopy before closing the
chassis or the stroller.
• Wash using a sponge and soapy water; do not use
detergents.
BRAKE
25• To brake the stroller while moving, pull the handle
on the handlebar towards you. To set the parking
brake, use the lever as shown in the figure.Always
set the brake when the stroller is not moving.
SAFETY BELT
26• A: Make sure that the brace is properly inserted by
pushing as shown in the figure. B: Fasten the belt
as shown in the figure.
27• To unfasten the belt, press on the buckle sides
and pull out the waist strap.
28• The new safety belt is now easier to fasten thanks
to the "snap-open-and-shut" device. Before
fastening the safety belt, attach the buckle to the
backrest by inserting the tab through the special
holder, as shown in the figure. After fastening
the safety belt on your child, detach it from the
backrest to allow the child more freedom of
movement. The buckle must remain below the
child's shoulders.
BACKREST ADJUSTMENT
29• The backrest of the stroller can be reclined in
several positions. To lower the backrest, lift the
handle as you recline the backrest, locking it at
the desired height. To raise it, push the backrest
up.
ADJUSTING THE FOOTREST
30• The footrest can be adjusted to two positions.
To lower it, pull the two levers downwards while
lowering the footrest, as shown in the figure. To
raise the footrest, lift it upwards until it clicks into
place.
SWIVEL OR STATIONARY FRONT WHEEL
31• To set the front wheel on stationary, turn the knob
counterclockwise (picture of padlock closed).
32• To swivel the front wheel, turn the knob clockwise
(padlock open).
AIR PUMP
33• To inflate the tires, use the pump located under
the seat. Slip the hose off the pump as shown in
figure A and screw it onto the opposite end of the
pump (Fig. B).
34• Remove the cap from the tire (Fig. A) and fasten
the end of the hose to the tire as shown in figure
B.
SHOCK ABSORBERS
35• All of the wheels are equipped with shock
absorbers. The rear wheels have adjustable
shocks; you can choose from “HARD” for soft
terrain such as sand and lawns, “SOFT” for rough
surfaces such as gravel and cobble stones, and
“MEDIUM” for smooth, firm surfaces. To adjust
the shocks on the rear wheels, turn the knob
to choose one of the three settings. We advise
adjusting both rear wheels to the same setting.
LEVERAGE BOARD
36• The rear leverage board helps the mother push
the stroller over slightly uneven ground.
FRONT BAR
37• The practical front bar opens and closes to make
it easier for the child to get in and out of the
stroller when he is older. To open the bar, press
the front bar button, which is located under the
armrest. Pull the bar outwards at the same time.
To close the front bar, carry out the instructions in
reverse order.
38• To remove the front bar, press both front bar
buttons under the armrest, while pulling the front
bar outwards.
39• The front bar is also extendible. To extend the
front bar, press the long button located under the
armrest and pull the front bar outwards. (Repeat
on the other side).
40• To shorten the front bar, press the long button
and push the front bar into the armrest. (Repeat
on the other side.)
SIDE DRINK HOLDERS
41• The stroller is equipped with two side drink
holders that fold away or pull out as necessary. To
pull the drink holders out, lift the upper part and
lower the bottom part, as shown in the figure.
42• Turn the disk outwards, and place your drink in
the holder. To clos e the drink holder, carry out