JESPoCkAr
カシオ ペダルユニット SP-33
CASIO Pedal Unit SP-33
Unidad de Pedal CASIO SP-33
Unidade de Pedais SP-33 da CASIO
組み立て方
Assembling the Stand
Armado del soporte
Montagem do suporte
*
注 意
• ペダルユニットをスタンドに取り付ける際、手などをはさまないようにご注意ください。
• 組み立ては、必ず平らな場所で行ってください。
*
CAUTION
• WheninstallingthePedalUnitontothestand,takecarethatyoudonotpinchyourngers.
• Thisstandshouldbeassembledonaatsurface.
*
PRECAUCIÓN
• Cuandoinstalelaunidaddepedalenelsoporte,tengalaprecaucióndenopillarselosdedos.
• Elarmadodeestesoportedeberealizarsesobreunasupercieplana.
#!3)/#/-054%2#/,4$
+"'!=dc"bVX]^&"X]dbZ
H]^WjnV"`j!Id`nd&*&"-*)(!?VeVc
C
MA1209-BPrintedinChina
SP33-WL-1B
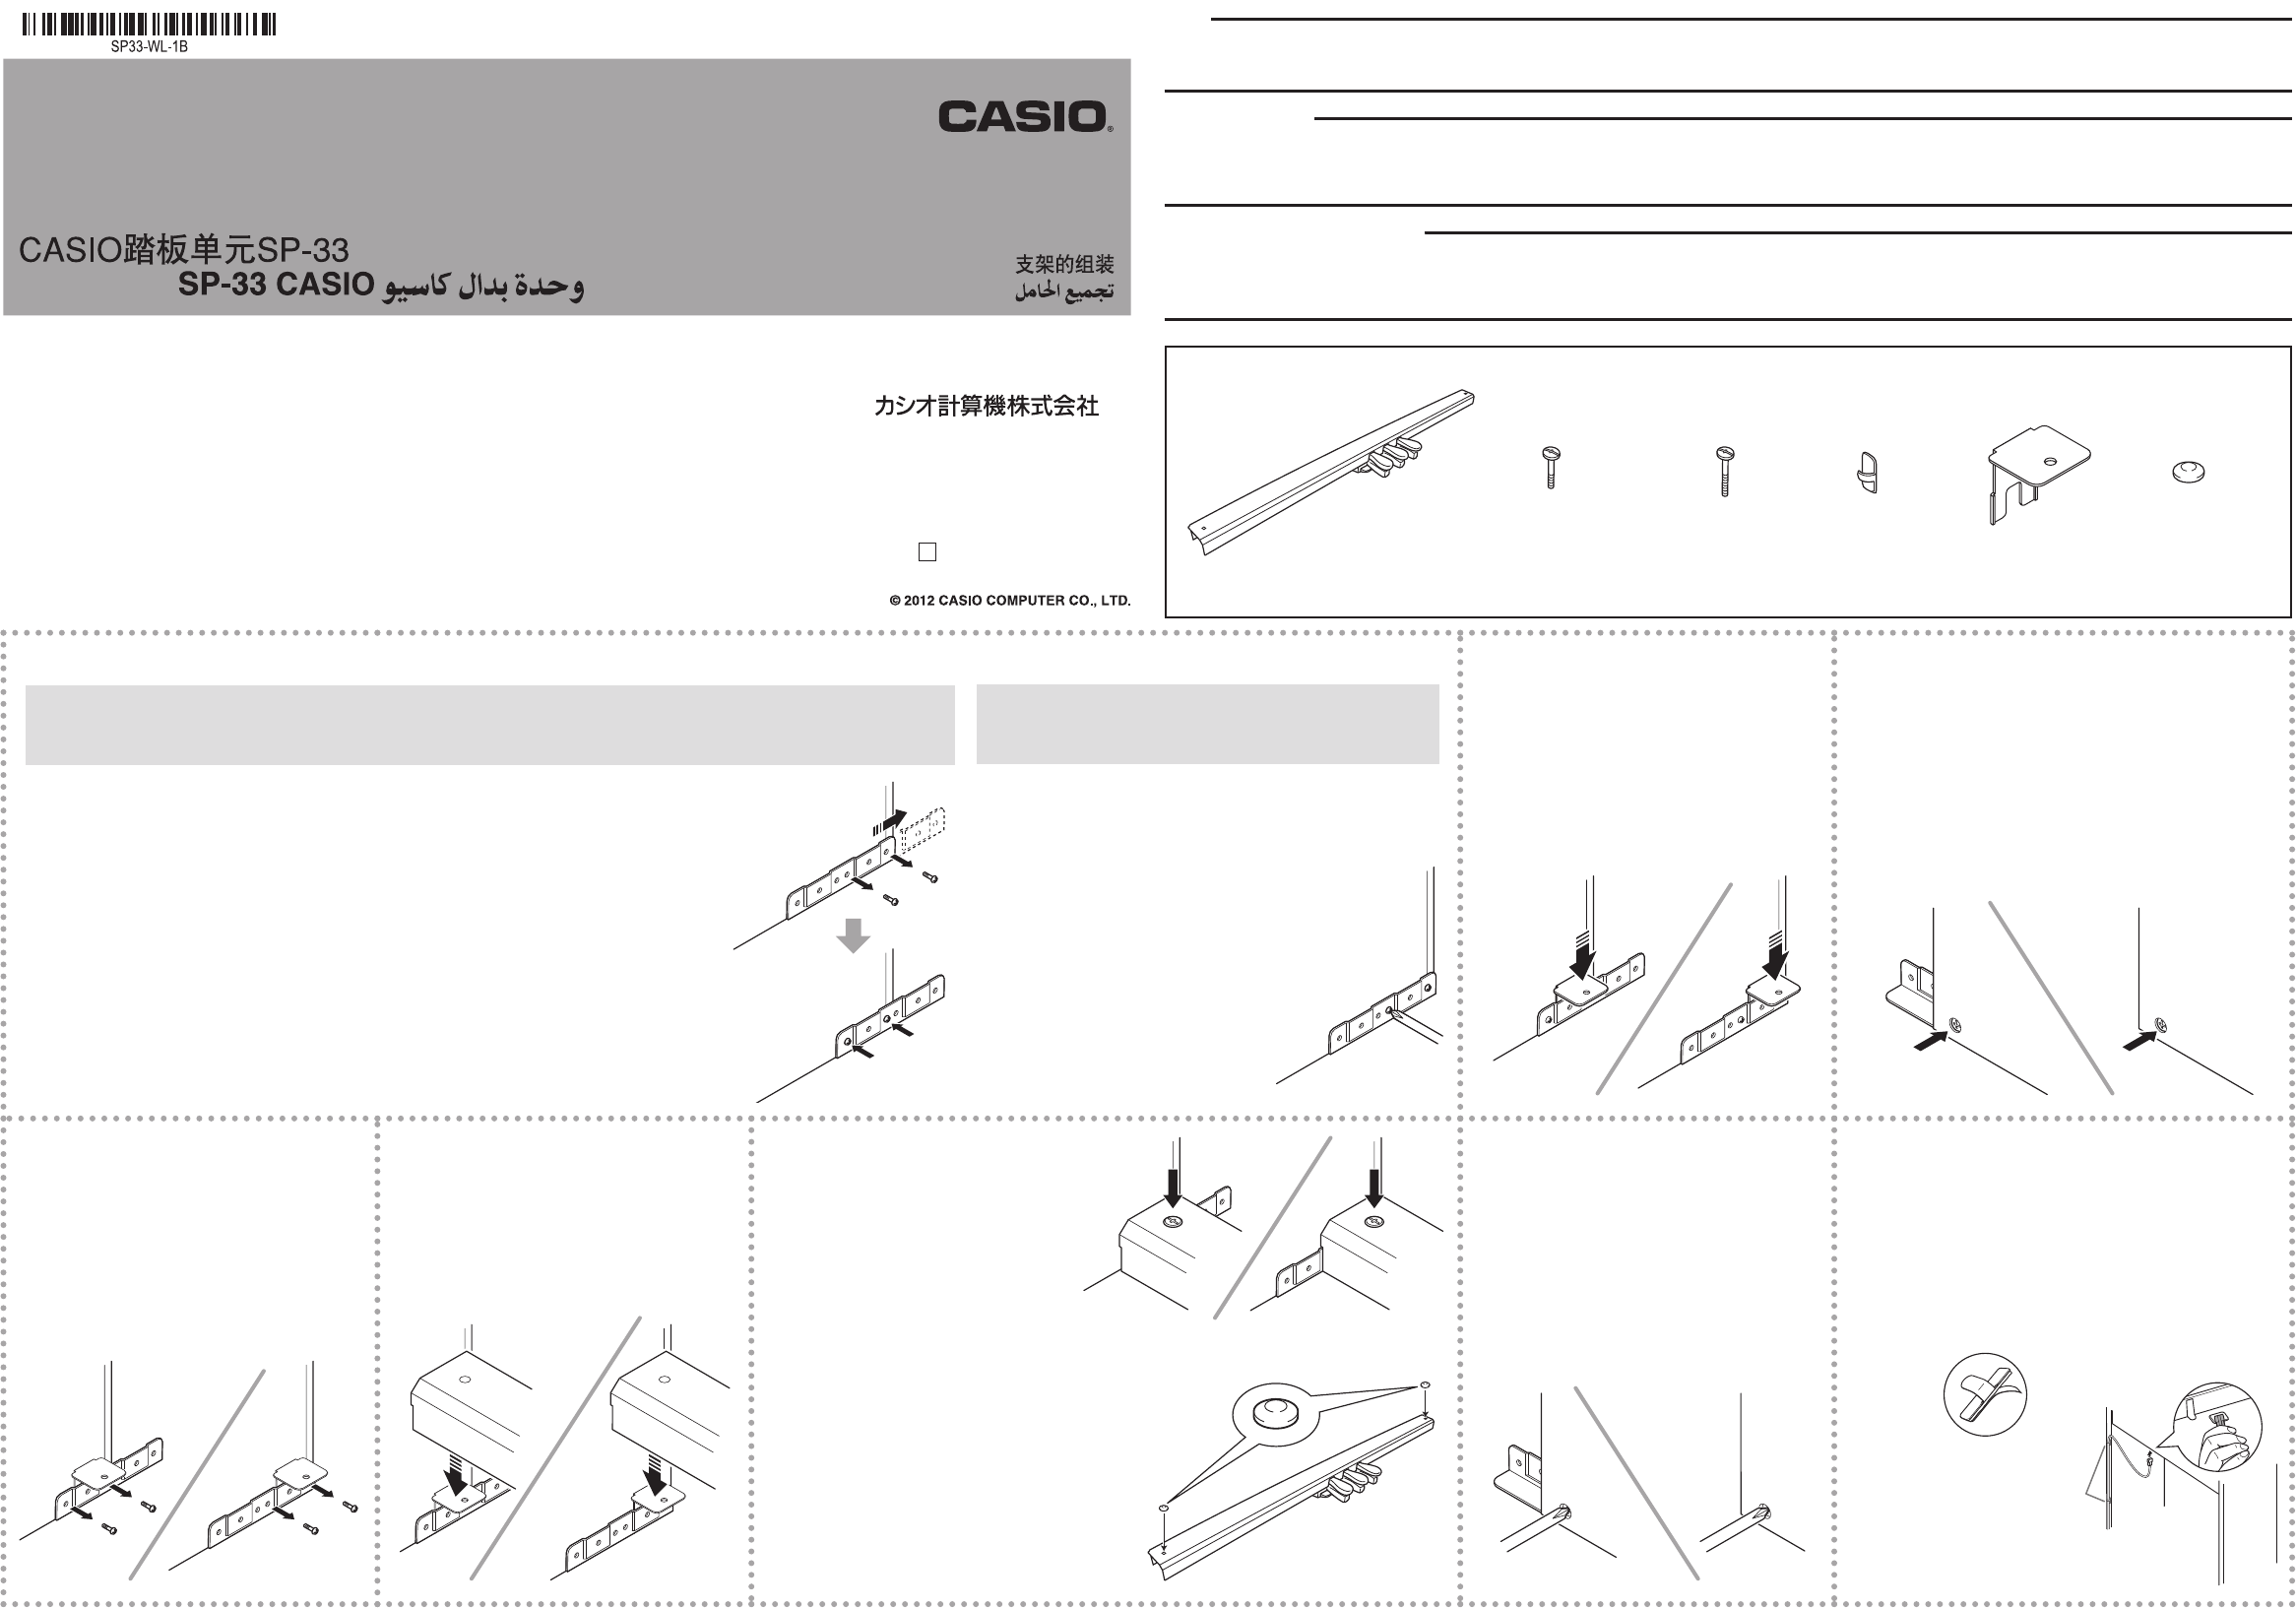
ペダルユニット
Pedal Unit
Unidad de pedal
×2
金具
Angle Brackets
Anclajes angulares
キャップ
Caps
Tapas
ネジ
Screws
Tornillos
×2
クリップ
Clips
Clips
×2 ×2
準 備
• 組み立て用の工具は付属しておりません。あらかじめ大きめのプラス(+)ドライバーをご用意ください。
• 最初に以下の部品がそろっていることをご確認ください。
GETTING REAdy
• Thisstanddoesnotincludeanyofthetoolsrequiredforassembly.ItisuptoyoutopreparealargePhillipshead(+)screwdriverfor
assembly.
• Beforestartingassembly,checktomakesurethatyouhaveallthepartsshownbelow.
PROCEdImIENTOs INICIAlEs
• Estesoportenoincluyeningunadelasherramientasrequeridasparaelarmado.TengaamanoundestornilladorgrandetipoPhilips(+)
pueslonecesitaráparaelarmado.
• Antesdecomenzarelarmado,compruebequecuentacontodaslaspiezasmostradasdebajo.
×2
ペダル取付用ネジ
Pedal Installation Screws
Tornillos para la instalación del pedal
スタンドを組み立てる前に /
Before Assembling the Stand /
Antes de armar el soporte
2
金具と側板の隙間に、SP-33 に付属されている
金具を差し込みます。
Inserttheanglebracketsthatcomewiththe
SP-33PedalUnitbetweenthepanelbracketsand
thesidepanels.
Insertelosanclajesangularesentregadosconla
unidaddepedalSP-33entrelosanclajesdelos
panelesylospaneleslaterales.
3
側板の外側から、SP-33 に付属されているネジを使って仮留め
します。
InsertthescrewsthatcomewiththeSP-33PedalUnitfromthe
outsideofthesidepanelsandtemporarilytightentheangle
bracketsinplace.
Insertelostornillosentregadosconlaunidaddepedal
SP-33desdeelexteriordelospaneleslateralesyapriete
temporalmentelosanclajesangulares.
4
スタンドの側板についている金具のネジ(左右4
箇所)を取り外します。
Removethebracketscrewsfromtheinside
surfacesofthesidepanels(twoscrewseach
panel,fourtotal).
Quitelostornillosdelosanclajesdelasupercie
interiordelospaneleslaterales(dostornillospor
cadapanel,cuatroentotal).
5
手順2で取り付けた金具の上にペダルユニットを
乗せます。
Mountthepedalunitontotheanglebracketsyou
installedinstep2ofthisprocedure.
Montelaunidaddepedalenlosanclajes
angularesinstaladosporustedenelpaso2de
esteprocedimiento.
6
SP-33 に付属のペダル取付用ネジでしっかり
固定します(2 箇所)。
Securelytightenthetwopedalinstallation
screwsthatcamewiththeSP-33PedalUnit.
Aprietermementelosdostornillosde
instalacióndelpedalentregadosconlaunidad
depedalSP-33.
7
ペダルの位置(高さ)を調整してから、手順 3で
仮留めしたネジをしっかり締めます。
Afteradjustingtheposition(height)ofthepedal,
securelytightenthescrewsyoutemporarily
tightenedinstep3ofthisprocedure.
Despuésdeajustarlaposición(altura)
delpedal,aprietermementelostornillos
apretadostemporalmenteenelpaso3deeste
procedimiento.
8
ペダルユニットのプラグをイラストと同じ向きにして、ピアノ
本体底面のペダルコネクターに差し込み、ペダルのコードをク
リップで固定します。
Orientingthepedalunitplugasshownintheillustration,plugit
intothepedalconnectoronthebottomofthepiano.Securethe
pedalcordwiththeclips.
Orientelaclavijadelaunidaddepedaltalcomosemuestraen
lailustración,eintrodúzcalaenelconectordepedaldelaparte
inferiordelpiano.Asegureelcabledelpedalconlosclips.
転倒防止金具を使う場合
UsING ThE ANTI-TIPPING BRACkETs
UsO dE lOs ANClAJEs ANTIVUElCO
壁から離れた場所に設置する場合は、スタンドを倒れにくくするために転倒防止金具を使います。
Usetheanti-tippingbracketstoprotectthestandfromtippingoverwhenitisinalocationthatisnotagainstawall,
etc.
Utilicelosanclajesantivuelcoparaevitarqueelsoportevuelquecuandoselocolocaalejadodeunapared,etc.
1
-a
スタンドの側板についている金具のネジ(左右4 箇所)を取り外して、金具を図のようにスライドさせます。
Removethebracketscrewsfromtheinsidesurfacesofthesidepanels(twoscrewseachpanel,fourtotal)
andthenshiftthepositionofthebracketsasshowninthegure.
Quitelostornillosdelosanclajesdelasupercieinteriordelospaneleslaterales(dostornillosporcada
panel,cuatroentotal)y,acontinuación,cambielaposicióndelosanclajes,comosemuestraenlagura.
1
-b
手順 1-aで取り外したネジを使って金具を仮留めします。
Replacethescrewsyouremovedinstep1-aaboveandtemporarilytightenthebracketsinplace.
Vuelvaacolocarlostornillosquitadosenelpaso1-aanterior,yjelosanclajesenposición.
壁に近づけてスタンドを設置する場合
lOCATING ThE sTANd AGAINsT A WAll
COlOCACIÓN dEl sOPORTE CONTRA UNA PAREd
1
スタンドの側板の底面についている金具の
ネジを緩めます(左右 4箇所)。
・
ネジを完全に取り外さないようにしてく
ださい。
Loosenthescrewsofthepanelbracketsat
thebottomofthesidepanels(twoscrews
eachpanel,fourtotal).
•Simplyloosenthescrews.Donotallow
themtocomecompletelyoutoftheir
holes.
Aojelostornillosdelosanclajesdepanel
enlaparteinferiordelospaneleslaterales
(dostornillosparacadapanel,cuatroen
total).
•Simplementeaojelostornillos.Nolos
saquetotalmentedesusoricios.
• スタンドの側板にクリップを2箇所、
図のように取り付けます。
• Notethatyoumustinstallthetwo
clipsonthesidepanelofthestand
asshownintheillustration.
• Tengaencuentaqueesnecesario
instalarlosdosclipsenelpanel
lateraldelsoporte,talcomose
muestraenlailustración.
ご注意
ペダルユニットをスタンドに取り付けた後に、付属の
キャップをネジにかぶせてください。
Important!
Afterattachingthepedalunittothestand,coverthe
screwswiththesuppliedcaps.
!Importante!
Trasjarlaunidaddepedalalsoporte,cubralostornillos
conlastapassuministradas.